

welcome back friday! if you’ve been following my instastories lately, you’ve no doubt seen the amazing transformation of my screened porch. it’s amazing what a fresh coat of a new paint color can do for a space. we have had a busy week here this last week, putting the finishing touches on the screened porch and the newly refinished basement, which we toured here on the blog as part of my day in the life series on wednesday. it’s taken years to get to this stage of my home redecoration and i have really enjoyed sharing a glimpse of my home with you – stay tuned for more! but in the meanwhile, enjoy a view of my refinished porch.
this week on fridays with oscar, we are dishing up a delicious sheet pan dinner out on the patio! just in time for Mother’s Day, can you believe it’s only ten days away? we have an a-ma-zing giveaway with Colleen Rothschild. and who doesn’t want to be pampered on Mother’s Day? two lucky winners will receive 1) a honey vanilla body bundle with loofah or 2) a tahitian monoi body bundle with loofah. scroll to the bottom of the post to see how easy it is to enter. don’t forget there’s 15% off your purchase.

outfit of the day
tie dye has an updated look this spring, as evidenced by my top today. this peasant-style popover has a distinct stripe tie-dye pattern that resonates with my love of all things striped. the vibrant indigo is offset with the bright white stripe pattern and i played this up by wearing white denim skinny jeans.
to add a little glam to my outfit today, i am sporting gold sandals and gold statement earrings (similar here). accessories that complete the look and give a vacation vibe to my outfit, and my attitude! I can imagine being on a vacation in the Greek Islands with this ensemble. it feels very Mediterranean.

silk tunic | jeans | sandals


sheet pan lemon rosemary dijon chicken with potatoes and asparagus
this recipe comes from one of my favorite food bloggers/cookbook authors: half baked harvest. she has a lot of sheet pan dinner recipes and this one is perfect for spring with the addition of asparagus. the feta green goddess dressing is a great topper and would be just as good on a salad or as a veggie dip.
you easily swap in or out whatever veggies you like, or have on hand. big chunks of carrot would be great if you’re avoiding starchy carbs. you could even swap the rosemary for thyme.


sheet pan lemon rosemary dijon chicken with potatoes and asparagus
- 6 tbsp olive oil
- 2 tbsp dijon mustard
- 4 cloves minced garlic
- 1 finely chopped shallot (or 1 tsp onion powder)
- 2 tbsp fresh rosemary (or 1 tbsp dried)
- 1 tsp smoked paprika
- juice and zest of 1 lemon
- kosher salt and black pepper (to taste)
- 2 lbs boneless chicken thighs or breasts
- 3-4 medium potatoes, cut into 2" pieces
- 1 tbsp raw sesame seeds
- 1 small bunch asparagus
feta sauce
- 4-6 oz feta cheese
- 1/4 plain greek yogurt
- 1 grated garlic clove
- juice of 1 lemon
- 1/4 cup fresh chopped herbs
- 1/4 tsp smoked paprika
- 1 pinch crushed red pepper flakes
-
Preheat oven to 425 degrees F. In a medium bowl, combine 4 tablespoons olive oil, mustard, garlic, shallot, rosemary, paprika, lemon zest, lemon juice, and a pinch each of salt and pepper. Add the chicken and toss well to combine. Let sit 15-20 minutes.
-
On a rimmed baking sheet, toss the potatoes with 2 tablespoons olive oil and the sesame seeds. Season with salt and black pepper. Roast for 20 minutes, or until tender.
-
Remove the potatoes from the oven and push them to one side of the pan. Put the chicken on the other side. Arrange asparagus around the chicken. Drizzle over 1 tablespoon olive oil, season with salt and pepper. Return the pan to oven and roast for 20-25 minutes more, until the chicken is cooked through.
-
Meanwhile, make the feta. Combine the feta, yogurt, garlic, and lemon juice in a blender and blend until smooth and creamy. Stir in the herbs, paprika, and a pinch of red pepper flakes. If desired, thin with additional lemon juice.
-
To serve, divide the chicken, potatoes, and asparagus between plates. Spoon the feta sauce over the chicken.

silk tunic | jeans | sandals


 april rain & a view of my refinished porch
it’s may 1st, but our april here in athens was a wet one! so i found this take on a classic vodka martini, called april rain. seemed appropriate, so if you like a martini and want to try something a little different, this is a great cocktail to try. the addition of lime juice gives it a fresh bright flavor.

april rain
- 2 oz vodka
- 1/2 oz fresh lime juice
- 1/2 oz dry vermouth
-
in an ice-filled cocktail shaker, combine the vodka, lime juice, and dry vermouth. Shake vigorously and strain into a coupe glass. garnish with a lime peel


fridays with oscar
well gang, here we are heading into may. the height of spring is around the corner. it’s been the highlight of my day to enjoy a cup of coffee in the quiet morning out on the screened porch, listening to all the bird songs. i hope you all can take a moment each day to enjoy lovely spring weather, birds singing and blooming flowers. oscar, ollie and i wish all of you a wonderful spring weekend!


to enter the Colleen Rothschild giveaway please follow Colleen Rothschild on Instagram along with Style at a Certain Age and throw your email address into rafflecopter. it’s that easy. winners will be announced on May 4th. good luck! in the meantime, here are some of the products from Colleen i’ve been using lately.
Hello and happy Saturday! Welcome back to Kelly’s Kitchen, It’s so great to see you again. Week before last, my husband and I received our first CSA (Community Supported Agriculture) box from Collective Harvest, here in Athens. This box of fresh, local produce makes me so happy! It is a joy to think of what to make with all the gorgeous veggies. We have been doing a lot of big, hearty salads with mushrooms, scallions, pepitas and anything else we can toss in. More on that in the coming weeks…. But for this week, I wanted to highlight one particular treat in our CSA box: strawberries. Early spring is the time for strawberries. And to go with our cute little basket of strawberries I wanted to make a pound cake. I found Melissa Clark’s recipe for Lemon Poppy Seed Pound Cake on the New York Times cooking site, so I thought I’d give it a go. Here’s how to make pound cake.

How to make pound cake
In reading the recipe, I noticed it calls for buttermilk. Well, I didn’t want to go out just for buttermilk. I know I can make my own by adding vinegar to some whole milk…but then I remembered my husband accidentally bought plain Kefir, instead of the plain yogurt on my shopping list a few weeks ago. Perfect!
For my strawberries, I didn’t want to go so far as to make a compote – I wanted to keep them mostly naked, but I did want a saucy-ness to them. I found an easy recipe from Bon Appetit’s latest issue to dress my berries.
Now, how about we make that cake:

Dish Towel | Microplane | Cutting Board | Batter Bowl | Loaf Pan | Measuring Cup and Mixing Bowl Set
Step 1: Preheat oven to 350 degrees. Grease and flour an 8-9 inch loaf pan.
Step 2: Combine the lemon zest and the 1 cup granulated sugar (I used organic cane sugar), massaging it together to create a sandy mixture.


Spouted Mixing Bowl Set | Whisk | Citrus Juicer | Prep Bowls
Step 3: Whisk in buttermilk (or kefir), lemon juice and 3 eggs.
Step 4: In a separate bowl, whisk together flour, salt, baking soda and baking powder
Step 5: Whisk dry ingredient mix into wet mix.

Batter Bowl | Loaf Pan | Dish Towel
Step 6: Whisk in the olive oil (it seems like A LOT, but just keep stirring until the batter is smooth and all the oil is incorporated) Then stir in your poppy seeds*.
*I think the poppy seeds can be totally optional. You can omit them and your cake will still be delicious!
Step 7: Time to bake! Place in the 350 degree oven and bake for about 1 hour, until it’s golden brown and the center top of the cake is firm.
How to dress strawberries
Meanwhile: Cut your berries into quarters or halves, depending on size and mix with a tablespoon or two of lemon juice and a pinch of salt and set aside.

Then: Heat 3 tablespoons of honey in a saucepan until bubbly.

I let my honey cool slightly then I poured it over my berries and stirred to combine. (The honey will seize up at first, but after sitting for a bit, it will dissolve in the acidic juices.*) Set aside, and stir occasionally.
*If you end up with little bits of solid honey in your berry bowl by the time you want to serve the berries, you can strain them out with a fine mesh strainer, no problem.

How to make a glaze
Also meanwhile: If you want to glaze your pound cake, take 1 cup of confectioners’ sugar and 4 teaspoons of lemon juice and mix until smooth. You can make it as thick or thin as you like by adding more lemon juice (thin) or more confectioner’s sugar (thick). Set this aside until your pound cake is cool.
Once your cake is done, set it out to cool slightly, then when it’s handle-able, turn it out on a wire rack placed over a sheet pan, turn the cake upright, and let it cool a bit more.

Sheet Pan | Wire Rack | Silicone Brush | Pyrex 4 Cup

Then use a pastry brush to brush the icing on your cake. I glazed the whole cake, even the sides. Then I did a second coat. 🙂

Let your cake cool all the way before you serve it. Slice it thick or thin, top with berries and enjoy!
PS: No one will be mad if you if you whip up some whipped cream to top it all off!
Lemon Poppy Seed Pound Cake
- 1 3/4 cup Flour
- Zest of 2 Lemons
- 1 cup Sugar
- 1/2 cup Buttermilk (or kefir!)
- 3 tbsp Lemon Juice (+ 4 Teaspoons lemon juice)
- 3 Eggs
- 1 1/2 tsp Baking Powder
- 1/4 tsp Baking Soda
- 1/4 tsp Fine Sea Salt
- 2/3 cup Extra Virgin Olive Oil
- 1 tbsp Poppy Seeds
- 1/2 cup Confectioners' Sugar
-
Heat oven to 350 degrees. Butter and flour an 8-inch loaf pan.
-
In a bowl, combine lemon zest and sugar and rub with your fingers until it looks like wet sand. Whisk in buttermilk, 3 tablespoons lemon juice and eggs. In a separate bowl, whisk together flour, baking powder, baking soda and salt. Whisk dry ingredients into the batter, then whisk in oil and poppy seeds.
-
Pour batter into prepared pan. Bake until a toothpick inserted in the center emerges clean, about 1 hour. Let cool in pan until warm to the touch, then turn out onto a baking rack set over a rimmed baking sheet. Turn cake right side up.
-
Whisk together remaining 4 teaspoons lemon and the confectioners’ sugar. Use a pastry brush to spread glaze evenly over top and sides of cake. Cool completely before slicing.
Thank you so much for stopping by today, I do hope you give this Lemon Poppy Seed Pound Cake a try, it’s so good for dessert or breakfast! Don’t forget, you can also find me on facebook and instagram. Thanks so much – I look forward to seeing you again next week! Take care and be well everyone. xo Kelly

Hello and happy Saturday! Welcome back to Kelly’s Kitchen, I’m so happy you’re here. Last week, we walked through how to make popovers. This week, I have been thinking a lot about comfort food. We all have our favorites; whether it’s a new favorite or a classic recipe from our childhood, comfort foods transport us to a place of safety, of easier times laden with memories. Comfort foods can feel like a generous warm hug, and for this reason can be therapeutic. Often times, our favorite comfort foods are not the healthiest choice. But that’s ok, because it’s likely we aren’t eating them everyday. But every now and again, it’s ok to indulge. And this makes them even more special! So join me today and learn how to make a skillet pizza.

how to make a skillet pizza
Pizza IS one of my most favorite foods. Along with tacos, I could eat pizza everyday and never get tired of it. That said, as I have become more conscientious about maintaining a healthy diet, pizza has become more of an occasional treat for me.
There are so many styles of pizza and I love them all! Today though, we are doing a skillet, or pan pizza. It’s similar to a Chicago style pizza: a puffy thick crust topped with cheese, then sauce.
This recipe is a two-day process because the dough needs to sit in the fridge overnight. Here’s how you do it, step by step:
Day 1: Dough

Step 1: In a large bowl, add your 2 cups (240 grams) all purpose flour. To this mound add ¾ teaspoon of fine sea salt to one side of the flour. Then add ½ teaspoon active dry or instant yeast to the side opposite the salt. Pour ¾ cup (170 grams) lukewarm water into the center of the flour. To this, add 1 tablespoon olive oil.
Step 2: Using a wooden spoon or silicone spatula, mix ingredients together to form a sticky shaggy dough. This will take about 1 minute by hand. Scrape down the sides of the bowl and form a rough ball. Cover with a towel and let sit for 5 minutes.

Wooden Spatula/Spoon Set | Serving Bowl with Lid | 8 oz Measuring Glass | OXO ¼ Cup
Step 3: After 5 minutes, uncover and grab the side of the dough furthest from you and fold it over the center of the ball towards you. Turn the bowl 90 degrees and do the same. You will do this a total of four times. Four 90 degree turns, Four folds. Then cover and let sit for 5 minutes.
We will repeat Step 3 three more times.

Step 4: After the fourth and last folding, cover the bowl and let sit at room temperature for 40 minutes.
Step 5: Refrigerate, covered for at least 12 hours, but it can sit for up to 72 hours.

Cambro 6 qt Container | Cambro 2 qt Container
*Pro tip: I prefer to transfer my dough to a fresh bowl or container (Cambro is my favorite) for the overnight rise. If you have another large bowl, coat it with a little olive oil and place your dough ball in, turn it once to coat in olive oil and leave it to rise, seam side down. Sweet dreams, dough ball.
Day 2: Toppings and Pizza Assembly
Step 1: About 3 hours before you want to serve the pizza, take it out of the fridge. The dough ball should be roughly double in size.

Cast Iron Skillet | Cambro 6 qt Container | Dish Towel | Oil Bottle
Step 2: Prepare your pan: your pan can be a 9 to 11 inch cast iron skillet (this is the best option for a crispy crust). I am using an 11 inch cast iron that my mom handed down to me, but you can use any oven-safe, heavy bottom skillet, or a 9 to11 inch round cake pan. Use about 1 tablespoon olive oil to grease your pan, be sure to grease the sides as well as the bottom.

Step 3: Place your dough ball in the pan and turn once to coat both sides. Press the dough out from the center to reach the sides of the pan. As you’re pressing out the dough, use your fingertips to dimple the dough. If your dough wants to shrink back, cover it and let it sit for 15 minutes. Then it should be more pliable and reach the sides, but if not, cover it and let it sit for another 15 minutes and try again. By now, your dough should reach the sides and you can push it up the sides a little to create the outer crust, like a pie.

Step 4: Cover and let dough sit at room temperature for about 2 hours
While the dough is having its second rise, let’s prep our toppings. Because the sauce goes on top of the cheese, I am making a chunky, meaty sauce to account for the toppings I would normally add to a thinner crust pizza.
*Why does the cheese go under the sauce? We don’t want to hinder the dough rise with liquid, nor do we want a soggy bottom. So the low-moisture mozz works as a barrier to keep the dough from getting too wet with sauce.

For my sauce, I am browning one pound ground Italian sausage (you can use links, just squeeze the sausage out of their casings). Once cooked through with crispy brown edges, I am adding 6 to 8 very roughly chopped crimini mushrooms. Add a generous pinch of kosher salt. Once the mushrooms are cooked through, reduce heat to low and wait about 3 minutes while the pan cools down slightly, this will hopefully keep the tomato sauce from splattering when it hits the pan. Pour in one jar of your favorite store-bought sauce, add another generous pinch of salt. Let this simmer, stirring occasionally until your dough is done proofing.
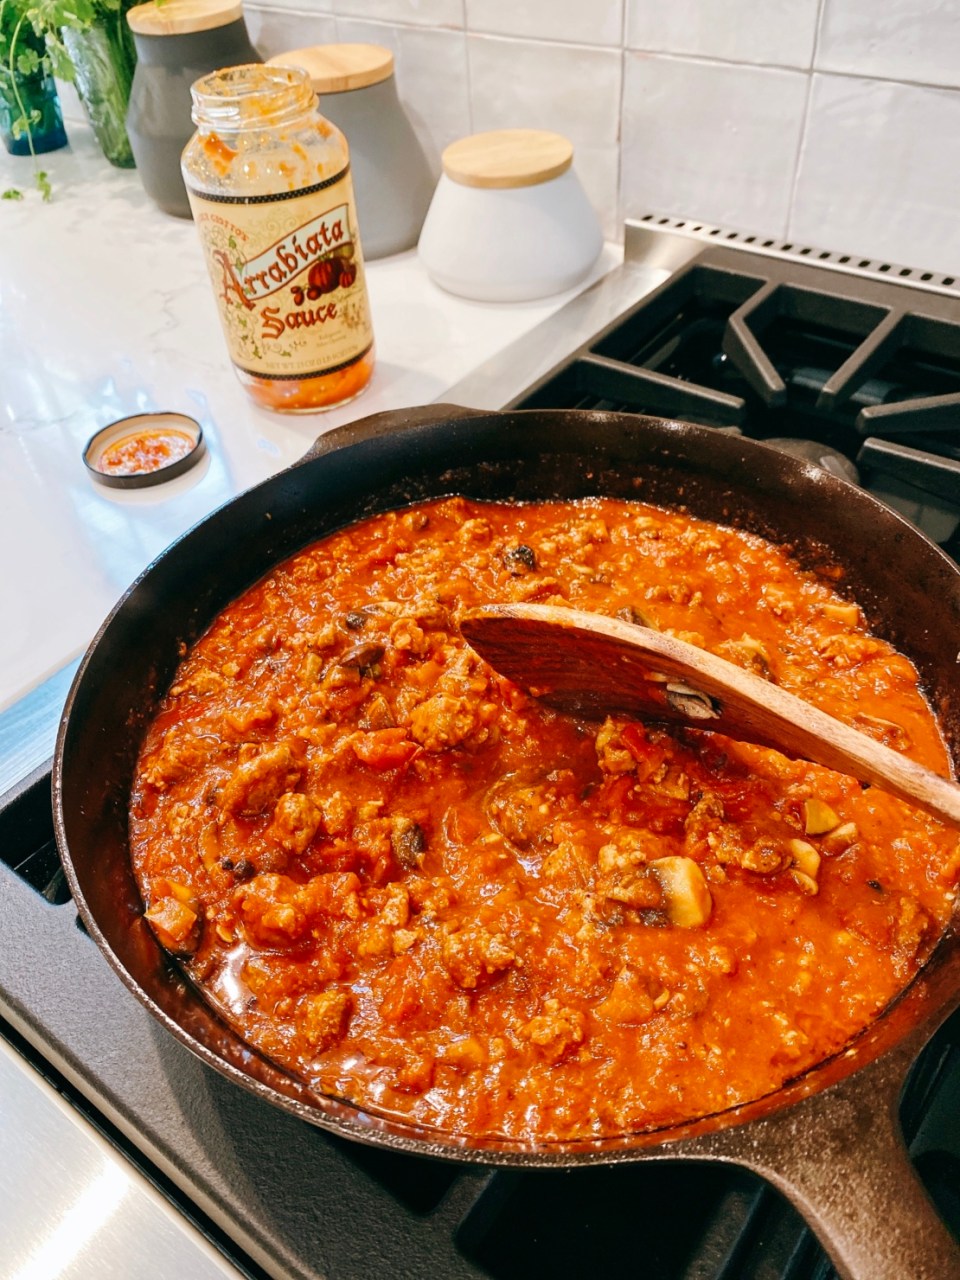
*Optional: about 5 minutes before the sauce comes off the heat, I like to add a generous sprinkling of thyme, fresh garlic, fresh cracked black pepper and crushed red pepper.
About 40 minutes before your dough is ready, arrange your oven racks so that you have one on the bottom for the pizza, and one about 5 inches from the top. Preheat your oven to 450 degrees.
At the two hour proofing mark, check your dough. You will know your dough is ready when it’s a little more puffy and/or when you poke it with your finger it springs back very slowly and leaves an indentation.
Pizza Assembly

Evenly sprinkle your shredded low-moisture mozzarella on the dough. I used about a cup of cheese, add as much as you like. I put cheese all the way to the edge because I like the crispy cheese bits, but you can leave some naked crust if you like.

We like pepperoni, so it’s at this point (after the cheese, but before the sauce) when I add the pepperoni.

Evenly dollop your sauce on top of the cheese (and pepperoni). You don’t want to heavily spread the sauce because you want to keep your cheese layer evenly distributed under the sauce.


Bake on the bottom rack for 18-20 minutes. When the cheese is bubbly and the crust is browning, use a spatula to check the bottom of the pizza.

Fish Spatula | Cast Iron Skillet | 2 Handle Cast Iron Skillet
If the bottom is golden to your liking and the top is also looking good to you, you’re all set and you can place the pan on the stove top to cool slightly. If the bottom is golden but the top could use a little more time, you can place the pan on the upper rack for a few minutes. All ovens cook a little differently, so just go with what looks good to you.

After your pizza has cooled for about 3-5 minutes, use your spatula to ease the pie out of the skillet or pan and place on a wire rack or cutting board for a few more minutes before cutting.
Top with grated cheese, crushed red pepper, fresh basil… whatever you like!

Thank you for checking in this week. I really enjoyed sharing how to make a skillet pizza. What are some of your favorite comfort foods? Let me know in the comments and be sure to let me know if there is anything in particular you’d like to see in this column. You can also find me on facebook and instagram. Thanks so much – I look forward to seeing you again next week! xo Kelly
*Editor’s note: As much as I love to make breads, pizzas, biscuits, etc., I am not super great at getting dough to come out right. I struggle with over-proofing, under-proofing, working my dough too much…you name it. But, here’s the thing: I don’t let it discourage me from trying again. So while this particular dough worked out the first try, I worried it wouldn’t the whole time! But if it hadn’t worked out, I would have tried it again, and again, until it did. It’s all an adventure!

Hello and happy Saturday! Welcome back to Kelly’s Kitchen, I’m so happy you’re here. Yesterday on Fridays with Oscar, Beth shared a great baked eggs recipe for an Easter Sunday brunch. Today I want to share with you a brunch side: how to make perfect herby popovers.

How to make perfect herby popovers
Popovers are similar to Yorkshire pudding; they are eggy, airy and light. A wonderful accompaniment to any meal, they are especially delicious for breakfast and brunch. They can go sweet or savory. Popovers can even be a main dish because you can fill them. Think: meat with gravy, or vegetables with a cream sauce; maybe for dessert with fruit and sweetened ricotta and a drizzle of honey. sky’s the limit!
To add a light flavor and scent to my brunch popovers, I am using Herbes de Provence which I pulverized a little further with a mortar and pestle. My particular Herbes mixture contains fennel, lavender, sage and tarragon. I think this mix is beautifully floral and savory, and goes well with a variety of jams, preserves and savory toppings.
While a basket of fresh warm popovers will be an impressive part of your brunch table, they are pretty simple to make. The trick to getting perfect popovers is all about the steam and the temperature of your ingredients. Popovers need steam to puff up and “popover”. If your batter is too cold they won’t build steam quickly enough to popover, if the batter is too warm it’ll cook the eggs and they won’t rise. There are important steps for getting the maximum amount of steam to give your popovers the loftiness they’re known for. We will cover those steps in today’s recipe.

Popover Tin | Muffin Tin | Sheet Tray
Let’s get started
You don’t need a special popover tin to make these. I happen to have a muffin tin and a popover tin, so I will show you how they come out in both. Popovers turn out somewhat amorphous regardless, so I don’t really have a preference for the tin.
*Pro-tip: put your tin on a sheet tray for a few reasons: a) to catch the drips, b) it’s easier to handle the tins and, c) the sheet tray will conduct heat more evenly.
Step 1: You will bake the popovers on a lower rack in your oven, so rearrange your oven racks as needed. Preheat your oven to 450 degrees, this will likely take about 30 minutes. Once you’re at temperature, put your tins in the oven to preheat for about 10 minutes while you mix the batter.
This is the first trick to getting the batter to steam – hot tins.

Mortar and Pestle | Pyrex 8 Cup | Dish Towel | Measuring Spoons
Step 2: Let your ingredients come to room temperature. You can either let the eggs and milk sit on the counter for an hour, or you can warm the eggs in hot water for 10 minutes and microwave the milk until it is lukewarm (about 1 minute).
Step 3: Mix your 3 eggs and 1 cup milk until frothy, you want a little air in there. The bubbles will help make the popovers light and airy.

Step 4: Add 1 cup of all purpose flour and ½ teaspoon coarse salt. Add the herbs (if using). I am adding about 1 teaspoon of my Herbes blend.
Mix thoroughly, but don’t over mix your batter or your popovers will be tough. It’s ok if there are a few small lumps in it. The batter should be pretty thin, like a thin pancake batter.

Step 5: I like to use butter to grease my tins instead of using cooking spray. What I like to do is drop a ½ inch-sized cube of butter into each well just before I pour in the batter. If you do it this way, cut your butter cubes before you mix your batter so they’re ready to go and aren’t too cold.

*Use caution when pulling tins from the oven, they’re hot and you will want to work quickly to get your butter in the tins and pour the batter before the tins cool too much.
Step 6: Pour the batter to fill each well about ½ full. Bake at 450 degrees for 20 minutes. Then reduce temperature to 350 and bake for 6-10 minutes more. Popovers should be golden brown and popping over, out of their wells.


Popover Tin | Muffin Tin | Sheet Tray
Step 7: Remove from the oven and transfer popovers to a wire cooling rack.

Step 8: Serve while still warm from the oven.

Top the pop
Popovers are extra special when you serve them with a variety of toppings. Because I made herbed popovers, I am serving them with homemade lemon curd, Georgia peach jam, creme fraiche and of course, salted butter. Cultured butter would be another delicious way to top your popovers.

Similar Orla Kiely Cheese Board | Mercer Dishware | Furoshiki Cloth
For a savory option, consider adding smoked salmon and creme fraiche to your array of accoutrements. My husband especially likes them this way. You can mix some lemon and chives or dill in your creme fraiche for more flavor!
Herby Popovers
- 1 cup Whole Milk
- 3 Eggs
- 1 cup All Purpose Flour
- 1/2 tsp Coarse Salt
- 1 tsp Dried Herbs (optional)
- Butter (for greasing tins)
-
Preheat oven to 450 degrees, preheat tins in oven
-
Mix room temperature eggs and milk until frothy
-
Add flour, salt, herbs and mix thoroughly
-
Remove tins from oven and drop in 1/2 inch butter cubes
-
Pour batter to fill wells 1/3 to halfway
-
Bake at 450 for 20 minutes, then reduce temperature to 350 and bake for 6-10 minutes more until popovers are golden brown and popping over
-
Transfer to cooling racks and serve warm

And that’s how to make perfect herby popovers. I hope you give them a try, they are deceptively simple and really add some specialness to your meal. Thank you for tuning in and be sure to let me know in the comments if there is anything in particular you’d like to see in this column. You can also find me on facebook and instagram. Thanks so much – I look forward to seeing you again next week! xo Kelly
can you believe it’s the Friday? and that this weekend is Easter?! this year, things are going to look a lot different for us all. and it’s worth taking a moment to think about that. Easter egg hunts will be postponed. we’re not going to be attending church services in person; or welcoming guests and family over for brunch. there is a sadness to that, but we cannot let it get us down. we have to look upwards first and forward second. how about attending a virtual service this year? and have your kids and grandkids FaceTime you during their Easter egg hunt. hopefully the weather where you are will be lovely and you can enjoy an Easter brunch al fresco. to that end, we’ve put together a sort of virtual Easter to get you in the spirit and inspire you to do one of your own. we have a brunch recipe today full of bright leafy greens and healthy protein from eggs and beans. it’s an easy recipe that you can customize to what you have on hand. our cocktail today is a brunch classic: the greyhound.

virtual Easter to get you in the spirit
i am dressing for the occasion today, forgoing my typical casual friday ootd for a shirt dress. even though i am staying put, how nice it is to wear a neutral spring dress. it’s a sunny warm spring day. i have the doorway to the porch open and there’s a lovely light breeze flowing in and my easter decor brightens up my home and table. 
poplin shirt dress | sandal | bracelet | earring


baked eggs with chorizo, chickpeas and kale
this is such an easy recipe for an easter brunch. it’s very customizable. the recipe here could go for four people, but can also be for two – with leftovers, and the leftovers keep well for a day or two. if you can’t get a hold of chorizo (spicy mexican sausage) you can do sweet or spicy italian sausage, you could even do breakfast-style sausage if you like. you can use kale, chard, beet greens, whatever you have! if you want to use navy beans or black beans, that’s good too. parmesan is great but if you wanted to use a different grated cheese, i bet it would work out just fine.

baked eggs with chorizo, chickpeas and kale
- 1 whole package chorizo (or, 1 lb sausage of your liking)
- 2-3 tbsp olive oil
- 1 can chickpeas
- 1/2 bag kale (or about 3 hefty handfuls)
- 1/2 chopped white onion
- 1/3-1/5 cup grated parmesan cheese
- salt and pepper to taste
-
heat 1 tbsp oil in skillet, add onions and cook until translucent
-
add sausage, brown and cook through
-
add drained chickpeas (add another tbsp of oil if needed)
-
once the chickpeas are softened, add kale in batches and cook until wilted
-
transfer mixture to a baking dish (or leave in pan if oven safe)
-
sprinkle with parmesan cheese
-
create 4 wells in the mix and crack an egg into each well
-
bake in a 375 degree oven for about 20 minutes or until the egg whites are set

tablescapes
i am getting my easter table set… aren’t these fabric carrots adorable? i love how they are black and white stripes and polka dots! unconventional, but they fit right in.

napkin rings | candlesticks | serving bowl | peter rabbit entertaining collection | fabric carrots | fabric carrots 2 | fabric carrots 3 | fabric carrots 4


napkin rings | candlesticks | serving bowl | peter rabbit entertaining collection | fabric carrots | fabric carrots 2 | fabric carrots 3 | fabric carrots 4


napkin rings | candlesticks | serving bowl | peter rabbit entertaining collection | fabric carrots | fabric carrots 2 | fabric carrots 3 | fabric carrots 4

the greyhound
fill an old fashioned or Collins glass with ice, pour in juice and vodka, stir and enjoy! if your grapefruit juice is too tart, add a splash of agave. or if you want to try something with a deeper grapefruit flavor add a dash of grapefruit bitters or grapefruit liqueur.

greyhound
- 2 oz vodka
- 4 oz grapefruit juice
- lemon or lime wedge (garnish)


poplin shirt dress | sandal | bracelet | earring


fridays with oscar
since we won’t be gathering together in person for holidays any time soon, i am curious to know what your solutions are for coming together with your family during the holidays this month. let us know in the comments below how you and your family will celebrate upcoming holidays this year. oscar, ollie and i wish all of you a happy easter. and as always, we will keep bringing you content that is relevant to our current situation, but is also a welcome distraction.

nordstrom sale
if you’re looking for some more Spring outfit ideas, head over to Nordstrom—up to 50% off during their “Better Together Sale“. i’ve picked out some of my favorites below. make sure to check them out!
hey gang! i decided to do something a bit different today. given everything that’s going on in the world, i went over to Pinterest to see what the trending topics were. i just wanted to know what people are talking about—what they’re thinking about and focused on—given the changing landscape. it came as no surprise that health & wellness was the #1 trending topic: i think most people’s focus right now is centered around maintaining and improving our health. but other topics that came up were recipes, reading, and skincare. funnily enough, we cover all of these topics regularly over here on the blog. so i thought i’d put together a mega-post today, pulling in all of these trending topics under one hood. enjoy!
pinterest roundup
i’ve had a presence over on Pinterest for a while now. it’s been a great tool for me personally, as it allows me track my personal interests in fashion, home design, and yes, health and wellness. i went through some of my old photos from my Pinterest archive. thought it would be fun to share some of my fashion choices throughout the years.


focus on health & wellness
health & wellness is an important topic on the blog. over the past few weeks, we’ve talked about everything from boosting your immune system to staying active by adopting a daily walking routine. for my regulars, you also know my involvement in FASTer Way to Fat Loss (FWTFL) over the past few years. i have shared and will continue to share my health journey. and as i’ve said before and will continue to say, FWTFL is a lifestyle, not a diet. this program, run by mastermind Amanda Tress, teaches how to fuel your body and maintain energy throughout the day while you naturally burn fat. it’s a proven method of restructuring and repairing your metabolic system and increasing your metabolism – something many of us struggle with since hitting menopause and beyond!


beauty & personal care
last week, i dedicated a post to my beauty routine. while poking around on Pinterest this weekend, i came across some DIY face masks that i’d thought i’d share. they’re both natural and super simple to make. i’m trying to the yogurt face mask today.
- 1 tablespoon Greek yogurt
- 1 teaspoon oatmeal
- 1 teaspoon honey
- 1 tablespoon oatmeal
- 1 teaspoon honey
- 1/2 teaspoon water

favorite recipes
for my regulars, you know how much we love food and drink over here on the blog. fridays with oscar is our regular column that we’ve been rolling out, well, every Friday since the inception of the blog. there, we bring you a casual OOTD, a recipe, cocktail and pictures of my German Shepherd Oscar and Maine Coon cat Ollie. and yesterday, my daughter-in-law, Kelly, published her first entry for her new weekly column Kelly’s Kitchen. now that we’re all at home, there’s obviously more time to spend in our kitchens cooking delicious and healthy meals. a few weeks ago, i rounded up some of our favorite recipes from fridays with oscar over the past few months. i couldn’t resist. here are a few more of our favorites.
sheet pan cajun shrimp, sausage and veggies
this is an easy one-pan dinner full of veggies and protein. i posted this one this past winter, and as such, i swapped the zucchini and squash for brussels sprouts. and because i didn’t want the extra starch, i omitted the potatoes. (remember, make all these recipes your own!) the old bay seasoning adds a ton of flavor reminiscent of the low-country boil we made a while back.

Cajun Shrimp and Sausage Vegetable Pan Sheet
- 1 lb large shrimp peeled and deveined
- 14 oz chicken sausage sliced
- 2 zucchini sliced
- 2 yellow squash sliced
- 1/2 bunch asparagus sliced into thirds
- 2 red bell pepper chopped into chunks
- salt and pepper
- 2 tbsp olive oil
- 2 tbsp cajun seasoning
-
Preheat oven to 400 degrees. In a large bowl, add the shrimp, sausage, zucchini, yellow squash, asparagus, bell pepper and salt and pepper. Add olive oil and cajun seasoning and toss until coated.
-
Spread evenly onto a sheet pan. Bake in the preheated oven for 15-20 minutes or until shrimp is pink and vegetables are tender.


chickpea and chorizo tacos
this recipe is easily customizable to your taste. it’s so simple and really takes no time at all. make the yogurt sauce a day ahead if you like. i used the full can of chickpeas instead of the half cup the recipe calls for.

Chickpea and Chorizo Tostadas
- 15 oz can chickpeas
- 1 lime
- 1/4 cup plain whole milk Greek yogurt
- 1 tsp kosher salt, divided
- 8 springs cilantro
- 2 links fresh chorizo (8 ounce total)
- 4 tostada shells
-
Rinse and drain 15 oz. chickpeas in a colander. Measure out ½ cup; reserve remaining chickpeas for another use.
-
Finely grate zest of 1 lime with a microplane or grater into a small bowl.
-
Cut lime in half and squeeze juice from one half into bowl with zest. Cut remaining half into 2 wedges; set aside for serving.
-
Gather 8 cilantro sprigs on cutting board. Starting at the stem end, finely chop stems until you get to the leaves; reserve leaves for serving. Add stems to bowl with lime.
-
Add ¼ cup yogurt and ½ tsp. salt to bowl and mix with a spoon to combine.
-
Remove casing from 2 chorizo links; discard. Heat a medium nonstick skillet over medium-low. Cook chorizo, breaking it up with a wooden spoon, until partially cooked, about 3 minutes.
-
Add reserved chickpeas and remaining ½ tsp. salt and mash together with back of spoon until chorizo is cooked through and crispy, 7–10 minutes. Remove from heat.
-
Spread reserved crema over 4 tostada shells.
-
Top crema with chorizo mixture.
-
Top with reserved cilantro leaves and serve with reserved lime wedges alongside.


book club
with mandatory shelter in-place orders in most states, we’re spending more time at home than, well, i don’t know when. a lot of us
i created the Facebook group, book club with style, as a place to discuss books and your love of reading as well as to connect with others of like mind. this group is also a place where you can connect with authors and get a ‘behind the scenes’ look at what it takes to write a book from beginning to end. published authors Hank Phillippi Ryan and Kerstin March are my lovely book club co-hosts. each month, one of us will lead a live video discussion where we will discuss the current book club selection. last month, we read woman on the edge and this month we’re reading the wartime sisters. make sure to join us!

woman on the edge | the wartime sisters

hey gang! it’s beth. for a long time now, i have wanted to open up the blog for a guest column. and with the new “normal”, now is the perfect time. saturday is our down day over here on the blog—so why not open it up for some new content?
over the past few years, many of you have reached out asking for more recipes and cooking-related content. turns out that that’s right up my daughter-in-law kelly’s alley. many of you know her: she’s been working here at style at a certain age behind the scenes for a long time now. but did you know that she’s also worked in and around the kitchen—personally and professionally—her entire life? a few months ago, kelly pitched the idea of a weekly cooking column. finally, i am excited today to introduce you to kelly’s kitchen—-her new weekly Saturday column.
Hello and welcome to Kelly’s Kitchen!
Hi! my name is Kelly. You may remember me from a few appearances on the blog over the last year. Since moving to Athens, Georgia last year with my husband, I have been working with Beth on the blog design and content.

My passion is for cooking. I did not go to cooking school, but prior to becoming a designer, I worked as a cook in a variety of restaurants, so I have picked up some tips along the way. But mostly, I cook by instinct. I rarely follow recipes to the letter, typically I will read a recipe as a guideline and alter it based on what I have on hand, or what I feel like doing.
How to make a French omelette
For this inaugural column, I want to start with the basics – eggs. Specifically, an omelette. It’s likely most of us have had an omelette of one flavor or another. But have you ever had a French omelette? A French omelette is just eggs and butter, a little white pepper, coarse sea salt and finely chopped chives. No filling. It’s cooked on low heat and rolled just before the eggs are completely set to create a creamy, slightly wet texture inside. So, here we go: how to make a French omelette.
A traditional French omelette is rich and satisfying all on its own, but what if you wanted to take it one step further? I got the idea to add Boursin to my French omelette from Chef Ludo Lefebvre when he made one on the PBS show, The Mind of a Chef. The addition of Boursin, he described, was the French version of adding American cheese to your omelette. Haha! Well, needless to say I had to try one!
After several messy attempts over as many Sundays, I finally got the hang of getting the eggs to roll up nicely and without any browning. Fortunately, the messy ones were just as delicious, so no one was disappointed. I am still not a pro, but it’s so rewarding when I get it right!

nonstick pan | silicone spatula | 4 cup measuring cup
It’s important to have the right tools. a nonstick pan and a silicone spatula make this recipe so much easier!

What is Boursin? Boursin is an herbed goat cheese spread. It’s widely available at the grocery store, but if you can’t find it, use plain goat cheese.

Be sure to mix your eggs very thoroughly to emulsify the whites completely. Try not to whip in too much air. Use a fork instead of a whisk.

Turn your burner to medium low. Add the butter to your nonstick pan.
Let the butter melt and foam a little, but don’t let it sizzle.
Add your eggs and sprinkle with a pinch of white pepper and flaky sea salt. Begin to stir vigorously with a silicone spatula while moving the pan in a circular motion. Scrape the sides so no crusty bits form around the edge of your eggs.

Pro tip: the trick with this technique, I learned, is to keep the flame low so the eggs don’t get ahead of you. It may seem like it’s taking forever, but trust me, in what seems like 3 seconds, your omelette can go from perfect to brown and overdone.
As soon as the eggs begin to coagulate, shake the pan to let the uncooked eggs settle. Once the eggs are cooked on the bottom, but still runny on top, lift an edge of the egg to check if it’s holding together in one piece. If it is, remove from heat and let sit for about one minute.

Add dollops of Boursin along the center of the omelette, perpendicular to the handle. then, starting at the edge closest to the handle, using your silicone spatula, lift the edge and begin to roll the omelette onto itself towards the center.

Once you have it this far, add more butter and tilt the pan to allow the butter to melt toward the omelette. This will help rolling it the rest of the way.

Continue rolling and then turn the omelette out onto a plate. If the dismount was messy, it’s perfectly ok to use your (clean) hands to reshape.

Smooth a little more butter over the omelette, sprinkle with flaky salt and chives. Et Voilà! You’ve done it! A fancy French omelette!

dinnerware | similar cloth napkin
Serve with a side salad of fresh leafy herbs and butter lettuce.
Side-salad
For the salad (make this before you begin your eggs):
- Tear butter lettuce into large pieces
- Roughly chop herbs such as Italian flat leaf parsley, cilantro and, or basil
- Toss together with a healthy drizzle of olive oil, and about ¼ cup apple cider vinegar
- Just before serving, sprinkle with flaky salt and a few cranks of fresh cracked pepper

Thanks for joining me today for my inaugural column: how to make a French omelette. Thank you, Beth, for this opportunity. You can also find me on facebook and instagram. I hope you all tune in next Saturday to Kelly’s Kitchen.
French Omelette with Boursin
- 2 large eggs
- 2 tbsp unsalted butter, room temperature, divided, plus more for serving (if you can get European-style butter (such as Plugra) great, but if not that's just fine)
- Fleur de sel or other coarse sea salt (pinch, to taste)
- Freshly ground white pepper (pinch, to taste)
- 1 oz Boursin pepper or herbed cheese
- 1 tbsp finely chopped chives
-
mix your eggs very thoroughly to emulsify the whites completely. try not to whip in too much air
-
add your eggs and sprinkle with a pinch of white pepper and flaky sea salt.
-
begin to stir with a silicone spatula while moving the pan in a circular motion. scrape the sides so no crusty bits form around the edge of your eggs.
-
as soon as the eggs begin to coagulate, shake the pan to let the uncooked eggs settle. once the eggs are cooked on the bottom, but still runny on top, remove from heat and let sit for about one minute.
-
add dollops of Boursin along the center of the omelette, perpendicular to the handle. then, starting at the edge closest to the handle, using your silicone spatula, lift the edge and begin to roll the omelette onto itself towards the center.
-
once you have it this far, add more butter and tilt the pan to allow the butter to melt toward the omelette. continue rolling and then turn the omelette out onto a plate.
-
smooth a little more butter over the omelette, sprinkle with flaky salt and chives.
as we close another week, i hope you have been digging into some long put-off household projects and tasks. now is the perfect time to do just that. it feels good to clean out the garage, the cupboards, the basement and just generally spring clean. having these things done before the weather calls us outside to work on garden projects will feel like a great accomplishment! so far this year, i have shared several home refresh projects with you: bathroom, bedroom, closet remodel, closet cleanse, kitchen and laundry, home gym, living room and home office. check out any of these recent posts to get inspiration for home projects! this week, i wanted to lighten things up with an anytime favorite: tacos. for our recipe today, it’s street taco Friday and Mexican beer cocktail, the Michelada. read on for the recipes!

outfit of the day
today’s outfit is perfect for a mild, sunny day. my white denim skirt from J.Crew is making its spring debut and it just goes so well with this light safari-style khaki jacket (limited supplies similar here and here) from Talbots. i love the color combination of khaki and white, it’s a perfect canvas to add a color pop or a colorful pattern. today i went with a multi-color stripe top. and for a little bling a sterling silver heart necklace from Lagos is casually chic.
and what better to pair with this ensemble than pecan-colored leather slide sandals. these Cypress sandals are a new purchase from J.Crew. the interlocking straps are a comfortable soft leather. the lighter tan color matches well with my white denim/khaki color combo.

trench coat | trench coat 2 | trench coat 3 | stripe tee | pencil skirt | sandals | belt


chicken street tacos
tacos are one of our favorite dishes in the djalali house. there are myriad ways to do a taco night, and we kept things simple this week with a street-style taco. typically a street-style taco is known to have corn tortillas filled with grilled, seasoned meat; topped with chopped onions, cilantro and a squeeze of lime. that’s it! but don’t forget the salsa and the pickled onions!

chip and dip | chip and dip 2 | tortilla warmer | placemats (discontinued similar tablecloth) | napkins | stainless steel fry pan
for this recipe, to get the crunchy, caramelized effect of a grill, i first browned my boneless skinless chicken thighs and cooked them through. once they were cooked, i shredded them in the pan, added more oil and browned them some more.

i used a taco seasoning packet for seasoning the chicken, but instead of cooking it to the package directions, i simply sprinkled about a tablespoon over the chicken after i shredded it in the pan.
Chicken Street Tacos
- 4-6 boneless, skinless chicken thighs
- 3-4 tbsp olive oil
- 1 tbsp taco seasoning
- corn tortillas
- chopped white onion
- chopped cilantro
- lime juice
- salsa
- chips
-
heat 2-3 tbsp oil in skillet and add chicken thighs
-
brown well on each side and cook through (chicken thighs are done at 175F)
-
take off heat and let cool enough to handle, then shred chicken thighs in the pan
-
set burner to low and add remaining oil. sprinkle about 1 tbsp of taco seasoning (add more or less to taste)
-
continue cooking on low to incorporate the spices into the chicken while you finish prepping the toppings
-
warm tortillas in a handy tortilla warmer like i did, or, place several tortillas on a plate and cover with a moist paper towel and microwave for about 20 seconds.
-
serve tacos with the toppings, lime wedges and chips and salsa.

for the quick pickled red onions:
Quick Pickled Onions
- 1/2 red onion
- 1 juice of 1 lime
- 1/3-1/2 cup apple cider vinegar
- 1/2 tsp kosher salt and fresh cracked black pepper to taste
- 1 tsp honey to taste
-
toss all ingredients together in jar or bowl
-
cover and refrigerate, let sit for at least half an hour before serving, but they will get better with an overnight in the fridge
michelada – authentic mexican beer cocktail
and now for the cocktail. this was picked by kelly. it’s refreshing with a bite. we loved it.

Michelada (Mexican Beer Cocktail)
-
run a lime wedge around the rim of a glass and dip in coarse sea salt and Tajin.
-
fill beer glass with ice cubes.
-
add Clamato juice, lime juice, Worcestershire sauce, soy sauce, hot sauce and a dash of chili powder.
-
top with your favorite Mexican beer. stir and enjoy immediately.

tajin | pitcher | pint glasses | serving tray

fridays with oscar
here we are again, another end to the work week and another close to fridays with oscar. we are working hard here at style at a certain age to bring you relevant content for these uncertain times, as well as uplifting thoughts and informative tips and tricks. i do hope you find some inspiration, solace and support from the community here on the blog. we are all in this together, doing our parts as individuals to come together as one, for each other. and we do want to take a moment and give a shout out to local and online business. Pet Supplies Plus local store in Athens is keeping oscar and ollie happy and healthy. and check out The Houndry Life that offer the cutest pet beds with removable covers made in America.
take care and be well, oscar, ollie and i wish all of you a restful weekend.

trench coat | trench coat 2 | trench coat 3 | stripe tee | pencil skirt | sandals | belt


well gang, here we are at the end of what was a decidedly challenging week. is it time for a drink? yes. yes it is. we don’t know how long the “new normal” is going to last, and i totally get that not only staying but also working from home is challenging for many. i have shared some of my tips and tricks on how to be productive working from home. unfortunately many here and around the world are not able to, which creates a whole new set of worries, and difficult times ahead. let’s continue to keep those people on the front lines—doctors, nurses, medical workers, grocery store employees and more—in our thoughts and prayers.

and as we finish another work week, let’s also take a moment to step outside and breathe the fresh air for our own sanity. let’s cook a meal and raise a glass because we are in this together and we are here for you. a friend of mine sent me a poem: Gerard Manley Hopkins’ God’s Grandeur. here’s one stanza below, as it gave me real comfort.
And fo all this nature is never spent;
There lives the dearest freshness deep down things;
And though the last lights off the black West went
Oh, morning, at the brown bring eastward, springs
so…onward – chin up. it’s fridays with oscar!
outfit of the day
much like the recipes today, my outfit is simple and comfortable. casual at its best. i love graphic tee shirts and this one is fun with colorful typography. to play on the colors of my tee, i have a bright orange cardigan and my orange-y suede d’Orsay flats are back in action to add symmetry to my pop of color.

t-shirt | sweater | shoes | jeans

one-skillet chicken with creamy sundried tomato sauce
for this recipe, i mostly winged it. and it turned out great! you can’t really go wrong with chicken, garlic, sundried tomatoes, and cream! experiment and have fun! for the vegetable, i chose asparagus since it is in season now, but you could go with broccoli, cauliflower, green beans…whatever you like or have on hand.

don’t worry too much about the ingredients, make it to your liking. i promise it will be a hit!


serving platter | dinnerware collection | dinnerware collection 2 | striped placemat

is it time for a drink: classic negroni
while my one-skillet chicken recipe isn’t specifically Italian, it sure felt like a natural fit with a classic Negroni. and a Negroni couldn’t be simpler.


peeler | glass tumbler | glass tumbler 2 | large square ice cube tray

fridays with oscar
this wraps up another fridays with oscar. so if you’re wondering whether is it time for a drink? the answer is definitely, “yes”. i hope you are navigating these new waters well and reaching out to friends and family. here at the blog in the coming days and weeks we want to address the most relevant topics in your life, while bringing some lighter content to your day and a smile to your face. let me know in the comments below what tips, tricks and topics you’d be interested to read here on the blog. oscar, ollie and i wish each of you a peaceful weekend.

t-shirt | sweater | shoes | jeans


newsletter sign up
get
delivered right
to your inbox!
style