

Hello friends! Welcome back to Kelly’s Kitchen. It’s so great you’re here today! I am sure you have all heard about the benefits of the Mediterranean diet: the plant-based diet traditional in places like Greece and Italy. Daily consumption of fruits, veggies, whole grains and healthy fats, with limited red meat and dairy is sustainable, well-balanced and has proven health benefits.
Chicken with Artichoke and Olives
Today, I am sharing a Mediterranean dish: Chicken with Artichoke and Olives. This recipe is an adaptation of Melissa Clark’s Braised Chicken with Artichokes and Olives. And I have to say that this recipe is a keeper!

Preheat your oven to 375 degrees. I am starting with four boneless, skinless chicken thighs. Pat them dry and get your pan hot over medium high heat with a couple tablespoons of olive oil. Salt and pepper your thighs and brown them for about 5 minutes on each side. Then, transfer the browned chicken thighs to a separate plate and set aside.

To the pan, add four cloves of smashed and roughly chopped garlic, one can of rinsed and drained chickpeas, and one can of artichoke hearts (drained and patted dry). Generously sprinkle the crushed red pepper flakes. Add more olive oil if you need to.

Once the artichokes have a little browning and the chickpeas soften (about 7 minutes on medium high heat), pour in the white wine, add olives, rosemary sprigs and lemon zest. Stir it up and nestle your chicken thighs back in the pan and bring to a simmer.


Cover the pan with foil or a lid and place in a 375 degree oven for 15-30 minutes or until chicken thighs are cooked through. My chicken thighs are pretty small and cooked quickly, but if your’s are bone-in, they might need the whole 30 minutes.

After pulling the pan from the oven, transfer chicken thighs to a plate. Over medium high heat, stir in a tablespoon of butter. Once the butter is melted, remove the pan from heat and place your chicken back in the pan. Squeeze lemon juice over the pan and sprinkle with chopped parsley.
Plate up your Chicken with Artichokes and Olives!

This dish is so easy and so very delicious. I love the way olives season a dish – such a flavor boosting ingredient. I used Kalamata olives and green Chalkidiki olives. The beans add a heartiness to this dish that I think is perfect for fall. I used chickpeas for this recipe, but I think Cannellini beans would be a good choice, too.

Thank you for spending some of your Saturday with me this week. We really enjoyed this dish and I hope it inspires you to try using Mediterranean flavors and ingredients in your cooking. An easy way to add Mediterranean flavor to any dish is with an herby green sauce; it amps up everything from roasted veggies to grilled fish. Don’t forget you can find me on Instagram and Facebook too! Take care everyone, be well. xo Kelly

Chicken with Artichokes and Olives
- 4-6 Boneless, Skinless Chicken Thighs
- 2 tbsp Olive Oil (more if needed)
- 1 14 oz Can of Artichoke Hearts (drained, halved and patted dry)
- 1 15.5 oz Can of Chickpeas (drained and rinsed)
- 1/2 cup Olives (Kalamata, Chalkidiki, or whatever you like) (halved or quartered)
- 4 cloves Fresh Garlic (smashed and rough chopped)
- 3/4 cup Dry White Wine
- Zest of Half a Lemon
- Juice of 1/2 – 1 Lemon
- 3-4 Rosemary Sprigs
- 1 tbsp Unsalted Butter
- Salt and Pepper to taste
- Crushed Red Pepper Flakes to taste
- Flat Leaf Parsley (garnish) (rough chopped)
-
Preheat oven to 375 degrees.
-
Salt and pepper chicken and brown in pan over medium high heat, about 5 minutes each side. Transfer chicken to separate plate.
-
Add garlic, artichokes, chickpeas and crushed red pepper flakes to pan. Add more olive oil if necessary. Lightly brown the artichokes, about 7 minutes.
-
Add olives, wine, lemon zest and rosemary to pan. Stir, then add chicken back to pan and bring to a simmer.
-
Cover and place in oven for 15-30 minutes or until internal chicken temp reads 165-170, or juices run clear.
-
Remove pan from oven and transfer chicken to separate plate. Over medium high heat, bring remaining juices to a simmer and add one tablespoon butter. Simmer until butter is melted.
-
Return chicken to the pan and add lemon juice and parsley.
hello thursday! here on the blog, thursdays are all about looking back through the archives to find topical posts from the past that are just as relevant and full of great ideas for recipes, fashion and home decor. in case you’ve missed any of my fall decor tours this week, check out my front porch or my living room, refreshed for fall. since we are fully into fall, i thought it would be a perfect time to revisit some of our fall tablescapes from last year. i love to set a beautiful table even if it’s only for two. especially this year as we are eating at home more often than ever, setting a pretty table is a gentle reminder that a dinner at home can be just as special as going out to a restaurant. enjoy today’s fall tablescape collection, i hope it gives you some inspiration for setting your fall table!
dinner party prep | fridays with oscar
what? it’s friday? already? on one hand i’m soooo happy the week has come to an end. but on the other hand where the heck is this year disappearing to? let alone this week? it’s funny but the blog keeps my inner clock running and i’m hyper aware when monday and friday roll around. thankfully, oscar is blissfully unaware of the week zipping by and is in his groove ready for his weekly gig. in fact, he’s helping, errr, watching me, prep for a dinner party this weekend. well, he did escort me to the herb garden to snip a few basil leaves for the bruschetta. a yummy appetizer which i’ll happily share at the end of the post.


the purrfect manhattan | skirt steak with chimichurri sauce


it’s chili outside | instant pot recipes
it’s friday gang! it’s been a solid week over here on the blog. in case you missed it, we did a deep dive into fall fashion aimed for the career woman (but also here). we also officially introduced a new YouTube series fashioned squared over here on the blog. definitely check it out, especially if you’re looking for outfit ideas. i show you three ways to wear a white shirt. video above. but today is friday. and i have a crowd over tonight—all of my sons are in town. and of course we could go out to eat, but there’s nothing quite like a home cooked meal. in the spirit of keeping it simple ya’ll—more time for laughs—i’ve got an instant pot turkey chili recipe for you. time to kick back, relax, and pour a drink.

similar glass pumpkins | pumpkin cocotte | bee glasses


before we launch into brand new fridays with oscar fall content, i thought it would be fun to stroll down memory lane through fall 2019. this week fridays with oscar revisits favorite fall posts from the september, october and november of last year. so kick up your feet, make a cocktail and enjoy the best of fall fridays with oscar!
porch refresh | apple cider mojitos | kitchen gadgets
it’s friday, gang! summer is over, and fall is here. out with the old and in with the new. as an (adopted) southern woman, that means a mandatory refresh of my porches: front and back. i love the gold undertones of fall leaves that give the oranges, the reds, and the yellows their subtle but unmistakable shimmer. out go any remaining semblances of lazy summer days, and in come any and all combinations of this color palette: whether it be the fall harvest—pumpkins and cornucopias—or spooky, but always fun, Halloween skeletons.


low country boil | top classic movie
it’s friday gang! another busy week here over on the blog: we rolled out definitive denim guide for fall in case you missed it. i’ve got a new episode of my friday fives on YouTube. this week i’m showcasing my top 5 mascara picks. be sure to check out the video below. and of course, oscar and i have a great recipe for you this week. in honor of the low country, we’ve put together a sheet pan, low country boil for you. super easy to make. and unbelievably delicious. you’re not going to want to miss it!


french dip and five rules every woman over 50 should break
we’ve got a really fun fridays with oscar for you this week. to kick things off, there’s a new installment of friday fives on our YouTube channel. this week, we talk about breaking women’s fashion rules, namely five rules every women over 50 should break. you’re not going to want to miss it, as it’s sure to bring a little fun, sass, and (a little) controversy to your friday.


well gang, this closes our walk through of best of fall fridays with oscar posts from 2019. get ready because next we are getting into a fall groove with new fall outfits, recipes, seasonal decor and so much more! have a wonderful weekend from oscar, ollie and me!

Hi everyone, welcome to Kelly’s Kitchen. It’s great you’re here today. This week, Alex asked to make Joojeh Kabob, which is a Persian Chicken Kabob. We haven’t had Persian food since we left California, so I thought this would be a good one to try.
Joojeh Kabob is typically served with grilled tomatoes and onions. We also grilled some lavash and I made some plain old rice. (We’ll save Tahdig for another post!) Our intention was to let the chicken marinate overnight, but because of all the rain this week, we put it off another day, so the chicken marinated for two days – which turned out perfectly.
Day 1 Marinade

This marinade is easy! It does call for quite a bit of saffron, half a teaspoon (which is about 1.4 grams). The strands are easy to pulverize. But if you don’t have a mortar and pestle, you can use the butt of your chef’s knife and a bowl. The marinade calls for half of the saffron water mixture. The remaining half will be part of the basting sauce.


Just mix the ingredients in a bowl. Add the cubed chicken, toss to coat. Then I poured the whole thing into a Ziplock, squeezed out the air and popped it in the fridge.

Day 2 (or 3) Grilling
Take out your chicken and get your grill going. While the grill heats up and the meat comes to room temperature, prep your veggies. I halved the tomatoes and cut the onion into eighths. Go ahead and start your rice (Basmati is best for this dish.)

The basting sauce is simply, lemon juice, butter and the remaining saffron water. combined and warmed through in a saucepan on the stove.

Researching grilling techniques for kabobs led us to discover a couple things: 1) definitely use flat skewers to keep your food from spinning on the skewer. 2) to get the best charring on your food, if you can, avoid using a grill altogether and let your kabobs sit directly over the coals. This required us to double thread the food to get longer skewers. It’s no problem if you can’t go this route, your kebabs will still be delicious if you cook them on grill grates.

Try to keep as many of the onions from the marinade on the chicken as you can when you thread the chicken. They will caramelize beautifully!
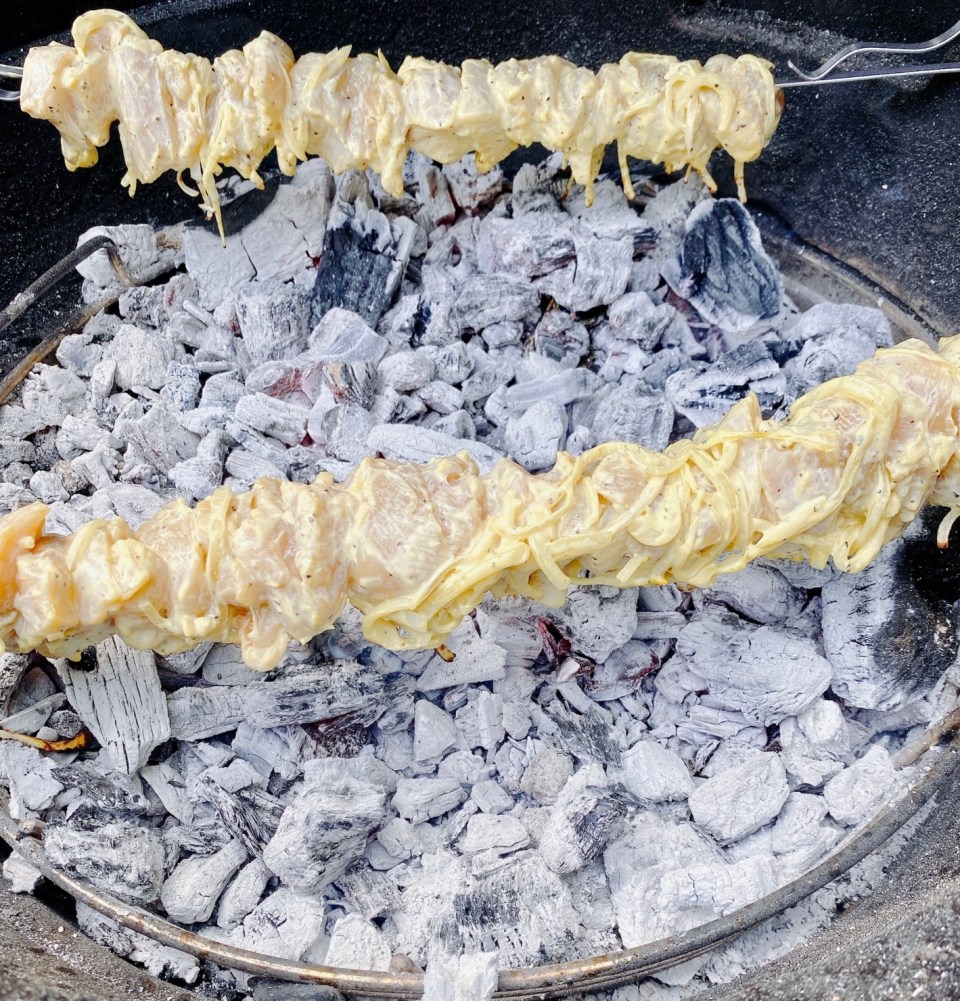
Our kettle grill is quite large, so this set up may easier for you if you have a standard size charcoal grill. Grill your kabobs for about 4-6 minutes each side, basting after the first turn then every minute until the chicken is done.
We found that doing the chicken this way first, then placing the grill grates on for the tomatoes and onions was an easier way to get an even cook on the tomatoes and onions.

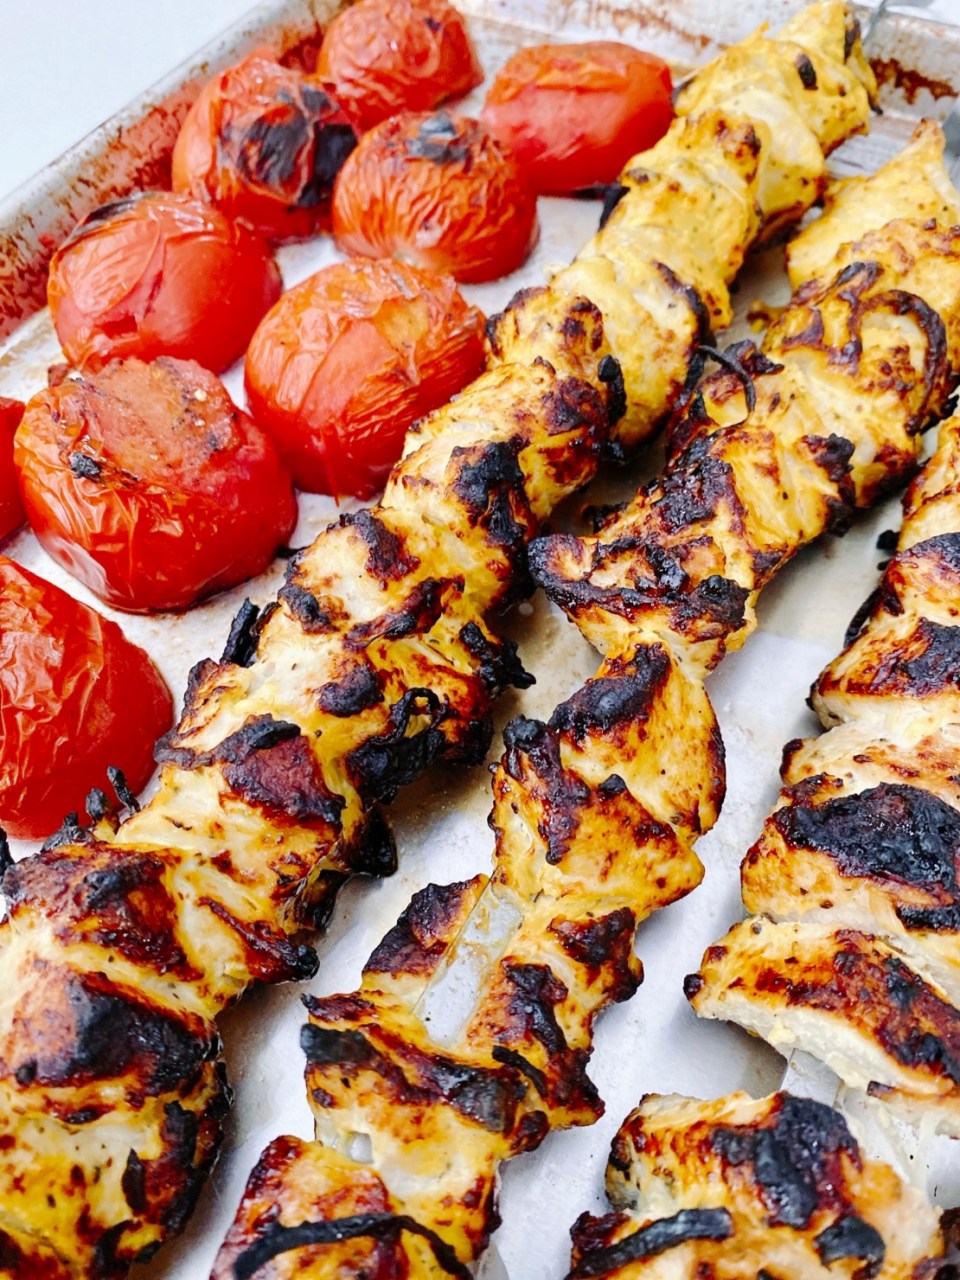

I plated the Joojeh Kabobs on a bed of rice; add tomatoes, onions and lavash. I also added some Israeli feta and parsley from the garden. The saffron is the real star of this recipe. Saffron lends a deep honey flavor, only it’s not sweet. It tastes like how honey smells, if that makes sense…. The smoky flavor from the charcoal combines with the saffron for a unique and distinct harmony of flavors.

Persian cuisine is one our favorites and I look forward to sharing more of our favorite Persian dishes with you! I do hope you give Joojeh Kabob (Persian Chicken Kabab) a try! They are simple to make and they are a wonderful way to experience the flavors of Iran.
Thank you so much for joining me today! Don’t forget you can find me on Instagram and Facebook too! Also, let me know if there is anything in particular you’d like to explore in this weekly column. Take care, be well, xo Kelly

Joojeh Kabob (Persian Chicken Kabob)
- 3.5 lb Boneless, Skinless Chicken Breast
- 2 Onions, thinly sliced
- 1/2 tsp Saffron, ground and dissolved in 2 tbsp hot water
- 1/2 cup Plain Yogurt
- 2 tbsp Olive Oil, EVOO
- 2 cloves Garlic, smashed and chopped
- 1.5 tsp Kosher Salt
- 1.5 tsp Ground Black Pepper
- 1/4 cup Unsalted Butter
- 1/4 cup Lemon Juice
- Rice, Lavash, Feta, Parsley, Grilled Onions and Tomatoes (optional serving suggestions)
-
Cut chicken into 2-inch cubes.
-
Place chicken in a large shallow container and mix in onions, half the saffron water, yogurt, olive oil, garlic, salt and pepper.
-
Coat all pieces of chicken completely with marinade
-
Cover (or transfer to a Ziplock) and marinate at least 6 hours and up to 2 days in the refrigerator.
-
Start your charcoal at least 30 minutes prior to grilling.
-
Thread chicken breast pieces close together onto metal skewers.
-
In a small saucepan add butter, lemon juice and the other half of saffron water. Cook this over medium heat until melted and combined.
-
Grill kabobs for 4-5 minutes on each side, basting with butter-lemon mix.
-
The chicken is done when the juice running out is no longer pink.
-
Let chicken rest about 5 minutes and slide off skewer.
-
Serve over rice with lavash, tomatoes and onions.
happy friday, gang! well, here we are at the end of august, can you believe it?! we are beginning to transition to fall here in athens: the mornings are a little cooler and we’ve had so much rain that it looks a lot more like fall than summer. but with the temps still in the 80s, today i am sporting summer shorts and a sleeveless top. we have a light appetizer and spicy, cool take on a margarita.

outfit of the day: animal print for (f)all!
animal print is a year-round go-to for me. it’s so fun each season to see the new takes on this print every year. leopard, cheetah, giraffe, large or small – there’s an animal print for everyone. if you think you can’t mix brown and black – think again! animals do it with aplomb. when you wear an animal print, nature’s most neutral color palette, you have endless combinations to create with your tops and accessories.

i love the big, bold pattern of these leopard print shorts. pairing them with a flowy white sleeveless top is an easy way to go.
animal print shorts | sleeveless top | sandals

and of course, metallic sandals will always go with animal print! but you could always go with gold or bronze too. when you with animal print for fall, you have a ton of options for accessories.


savory Thai turkey lettuce wraps

these lettuce wraps are easy and delicious. a perfect appetizer or lunch, they are savory, spicy, and light. if you want something more substantial than a lettuce wrap, the ground turkey mixture would be great in a corn tortilla too.

Thai turkey lettuce wraps
- 2 medium bell peppers, seeded and diced
- 1 tbsp vegetable oil
- 3 cloves garlic, chopped
- 1 lb ground turkey
- 2 tbsp fish sauce
- 1/4 cup packed fresh cilantro, chopped
- 1/4 cup packed fresh mint, chopped
- 3 tbsp fresh lime juice
- 1/2 tsp sugar
- lettuce cups and sriracha for serving
-
In 12-inch skillet on medium-high, cook bell peppers in vegetable oil 3 minutes. Add garlic; cook 30 seconds. Add ground turkey and fish sauce. Cook 5 minutes, breaking up meat.
-
Stir in cilantro, mint leaves, lime juice and sugar. Serve in lettuce cups with Sriracha hot sauce, if desired.

the turkey mixture itself is not spicy, but add sriracha as a topping to spice it up as much as you like. another great topping would be chopped peanuts.


spicy cucumber margarita

you all know i love a margarita and there are so many varieties. this spicy cucumber version is spicy from the jalapeño, yet cool thanks to the cucumber. it’s a really nice combination of flavors. rim the glass with tajin and you get a nice spicy, sour pop of flavor.
spicy cucumber margarita
- 3 parts tequila blanco
- 1/2 part triple sec
- 1 part lemon juice
- 1 part lime juice
- 1 part agave nectar (optional)
- mini cucumber
- jalapeño
-
Muddle 1-2 thin slices of jalapeño pepper in the bottom of a cocktail shaker with the lime, lemon and optional agave nectar juices. Add the Tequila, Triple Sec and a handful of ice. Shake and strain into a margarita glass over ice. Garnish with thinly sliced cucumbers, and Jalapeño slices (optional for spice).

fridays with oscar

this is a wrap on another fridays with oscar. as september approaches, we have been looking at summer clothes that transition to fall with ease and style. in case you missed it, tuesday’s post was all about going into fall with bold bright colors (and don’t forget animal print for fall!). it’s a sure way to welcome the new season with confidence and a smile. oscar, ollie and i wish all of you a gorgeous weekend!

Hello there! Welcome back to Kelly’s Kitchen; I am happy you’re here today. I have another summertime recipe for you this week: cold soba with miso eggplant. At this point in the summer, cool and refreshing meals are just the thing to beat the heat. I remember summer’s past, when I would visit friends in Los Angeles, we would always go to Little Tokyo to get cold soba. I remember the first time I had cold soba, I didn’t know you dipped the noodles into sauce, rather than pour it all over the noodles. And before my friend could stop me, I had poured my dipping sauce over my noodles. Such a faux pas!

I have always loved Japanese noodles, but what a revelation that first plate of cold soba was! I hadn’t had cold soba in a long time when Alex asked me to make some, so I thought it might be a good recipe to share with all of you! We had some Japanese eggplant in our CSA box, so I have a miso roasted eggplant to go along with the soba.
Let’s start with the miso eggplant.

Japanese eggplant is the long skinny cousin of the Italian eggplant; it has slightly sweeter flesh and softer skin. I had five of them, and I just sliced them into half inch thick slices. Drizzle about a teaspoon of sesame oil and add two teaspoons of light miso. Then add a generous sprinkling of togarashi and furikake. Gently stir to coat the eggplant with the miso and oil. Spread the slices out on a rimmed baking sheet.

Togarashi is a Japanese 7 spice blend. It’s a little spicy and usually has a combination of chiles, orange peel, sesame, and nori. It’s a great condiment for anything really, but you’ll often see it with noodle soups.
Furikake is another great Japanese condiment, mostly used to flavor a bowl of rice or onigiri (Japanese rice ball), but I like it on soups and noodles too. There are tons of varieties out there, but usually it consists of dried fish, seaweed, salt and sesame seeds. Mine happens to be a yuzu variety.
Miso Roasted Eggplant
- 5 Japanese Eggplants, sliced into 1/2" pieces (or Italian eggplant)
- 1 tsp Sesame Oil
- 2 tsp Light Miso
- Togarashi and Furikake to Taste
-
Preheat oven to 325 degrees
-
In a bowl, to the sliced eggplant, add sesame oil and miso. Stir gently to coat. sprinkle togarashi and furikake to taste.
-
Spread eggplant on a rimmed baking sheet and sprinkle with more togarashi and furikake if needed. bake for about 15 minutes or until eggplant is tender and golden.
I roasted these guys at 325 degrees for about 15 minutes or so. Keep an eye on them and pull them out when they’re tender and golden.

Dipping Sauce
The soba dipping sauce is easy to make. I had some leftover dashi (dashi is a typical Japanese stock made from kombu, dried bonito flakes and water) so I started with that. But you can use chicken stock, if you like.
Cold Soba Dipping Sauce
- 1 cup Dashi or Chicken Stock
- 1/4 cup Soy Sauce
- 2 tbsp tablespoons mirin or 1 tablespoon honey mixed with 1 tablespoon water
-
Combine dashi or stock, soy sauce and mirin. Taste, and add a little more soy if the flavor is not strong enough. Serve noodles with garnishes, with sauce on side for dipping

Condiments
In addition to the dipping sauce, I have my eggplant and my other condiments are pickled ginger, wasabi and finely sliced scallions.

Green Tea Soba
For a fun alternative, the noodles I have are green tea soba noodles. Cook the noodles in boiling water according to the package directions, strain and quickly plunge noodles in an ice bath and stir with your hand to circulate the ice water until they are completely cool.
The plating of cold soba makes this dish special, it’s so simple. I have a rectangular plate which is perfect for serving the noodles and the dipping sauce on one dish. You will want to have the sauce on the same plate as the noodles because, as you can imagine, the dipping sauce will drip.

I sprinkled some furikake on the finished noodles. and added my scallions to the side

Savory, umami-rich flavors of Japan in the simplest of summer dishes. Definitely try cold soba with miso eggplant; it’s so refreshing and satisfying. If you’re in the mood for something else simple, refreshing and cool, try my ceviche recipe.
Thanks everyone for joining me today! Don’t forget you can find me on Instagram and Facebook too! Also, let me know if there is anything in particular you’d like to explore in this weekly column. Take care, be well, xo Kelly

Utensils and Ingredients Found in This Post
Hello and welcome back to Kelly’s Kitchen! I am happy you’re here today, as I have a fun recipe to share with you. A couple months back I shared a skillet pizza recipe; in which I noted that pizza is my favorite thing of all time. Well, today I am putting my pizzaiolo experience to good use. Get ready because this is how to make Mexican-inspired pizza!
This is not your typical Mexican pizza, which I think is usually, basically, taco toppings on a pizza. Today’s recipe is something wholly other. We have a smoked poblano pepper cream base, mexican chorizo, cotija cheese, cilantro and pickled red onions.
Smoked Poblano Cream Base
Once upon a time, (2011-2012, I think it was) I worked on a wood fired pizza food truck. It was an amazing experience. One of the things I took from that time was the idea of a smoky, slightly spicy, cream sauce that could accompany pizza toppings in the best of ways. I never knew the recipe for the smoked poblano paste that flavored the cream sauce, but I have tried to replicate it, and I think it works.

If you don’t have the ability to smoke the poblanos, you can char them either in the oven or on a grill. If you char them, you will want to scrape off the charred skin before pureeing them. I have poblanos and banana peppers. To the puree, I added a few generous pinches of salt and about a tablespoon of apple cider vinegar. If you char them and want a smokier flavor, add a little smoked paprika to the puree.

To make the cream base, take eight ounces of mascarpone and mix with about one cup of the poblano puree. About the ratios: this will make a lot of poblano cream base. if you anticipate being able to use it on sandwiches or as a dip make this amount. However you will get enough for one pizza by quartering these ratios. I will say too, that the poblano puree makes a great salsa and will freeze well, too. A tablespoon or two makes a really nice seasoning for chili, soup or you can add it to a marinade.


This Mexican-inspired pizza has a thin base of the poblano cream, a layer of mozzarella cheese and Mexican chorizo. The exciting part comes with what goes on the pie when it comes out of the oven: another drizzle of the poblano cream, cotija cheese crumbles, pickled red onions and fresh cilantro.
The Prep

Preheat your oven to 450 degrees.
Today, I am keeping it simple and using Trader Joe’s premade dough. If you’d like to make your own dough, refer back to my skillet pizza recipe for a great dough recipe.
Typically Mexican chorizo is a more liquid-y sausage that firms up as you cook it. But it can come in different ways. If it’s in a casing, remove the casing and chop it up in the skillet while cooking so it’s a ground beef consistency. Cook up your chorizo and spoon it out onto a paper towel-lined plate or tray to drain.
I poured my poblano cream into a squeeze bottle so I could squeeze out a nice even drizzle of the cream as my base sauce. Go ahead and crumble your cotija into a bowl. Pick your cilantro leaves into a nice big pile. Have your mozzarella portioned out and ready go, use however much mozz you like. The pickled onions are homemade. it’s easy to whip up a batch.
Quick Pickled Onions
- 1/2 Red Onion, thinly sliced
- Juice of 1 Lime
- 1/2 Cup Apple Cider Vinegar
- 1/2 tsp Kosher Salt
- Black Pepper to Taste
- 1 tsp Sugar, Agave or Honey
-
Toss all ingredients into a jar. Cover and shake. Refrigerate at least one hour before using.
The Dough
Generously flour a pizza peel and place your dough ball on the flour. sprinkle more flour on the top of the dough and spread the flour over the whole surface.
Make a Crust
With your hands cupping the sides of the dough, shape the dough into a disc. Then, with one hand cupping one side of the dough, use the fingertips of your other hand to press down the dough, about one half inch in from the side. Turn the dough as you press it down.

Using your finger tips, flatten the center, leaving the crust as a ridge all the way around. Flip the dough over and flatten the center with your hands.

Then, with one hand lift up the dough and flip it onto the back of your other hand.
With the backs of both hands begin to stretch the dough. You can gently toss and spin the dough up while you move your hands apart from each other. Or you can move one hand over the other underneath the dough to turn it as you stretch.
Once the dough is stretched out about 12 inches, flour your peel again and lay your dough down.
Now you have to work quickly to keep the pizza from sticking to the peel. Remember my great idea to put the cream sauce in a squeeze bottle? Well, that did not work out as expected because the pepper puree was a little too chunky and got stuck in the spout.

Not to worry! I just took off the lid, glopped out a couple tablespoon’s worth of cream, grabbed a pastry brush and spread it around.
Now for the cheese. Then the chorizo and a little more cheese.

Give your peel a few quick flicks from side to side to ensure your dough is not stuck. If it is stuck, gently lift the pizza and toss in a bit more flour and flick the peel again. This should solve it. The dismount from the peel to the pizza stone can be stressful. Don’t worry though. It’s ok if you lose a couple toppings. Let the pizza cook for about 12 minutes, or until the cheese is bubbly and the crust is golden. An aluminum peel is a great tool for turning the pizza and for pulling it out of the oven.

While my pizza was cooking, I actually cut the spout of my squeeze bottle about halfway, to create a larger opening for my chunky cream sauce to squeeze out.
When the pizza is out of the oven, drizzle on more cream sauce. Alternatively, you can spoon the cream sauce on. Modifying your squeeze bottle is totally optional!

Sprinkle on crumbled cotija.

Add the pickled onions and the cilantro. A masterpiece!

Slice it up!

This combination of toppings is one of my favorite ways for pizza. The flavors are fresh and unexpected. The cream sauce is light and smoky with just a hint of spicy. The acid from the pickled onions rounds it out very nicely. I can’t tell you enough how much I love pizza! I do hope you give this Mexican-inspired pizza try. If you want to make it a skillet pizza, just wait to add the cream sauce until it comes out of the oven.

Thanks everyone for spending some of your Saturday with me. Don’t forget you can find me on Instagram and Facebook too! I am always looking for new ideas so please do let me know if you have any requests for upcoming recipes. Take care, be well, xo Kelly
Mexican-inspired Pizza Toppings
- Smoked Poblano Cream Sauce
- Low Moisture Mozzarella
- Mexican Chorizo
- Cotija Cheese
- Fresh Cilantro
- Pickled Red Onions
For the Smoked Poblano Cream Sauce: Take 2-3 smoked or charred poblano peppers, scrape off skins and puree to a salsa consistency. Add a few generous pinches of salt and about a tablespoon of apple cider vinegar. Mix one cup puree with 8 oz Mascarpone

hello and happy friday, gang! can you believe it’s memorial day weekend?! we are celebrating with a memorial day cookout today. much like our mother’s day post a few weeks ago, we are embracing the changes in our recent day-to-day lives while still engaging in what we would normally be doing, with slight modifications. instead of a neighborhood gathering, it’s just us. but why not still make it special? we have a delicious menu planned, with a fun seasonal cocktail. here’s how to put together a memorial day cookout.

outfit of the day
i just love this bright shade of pink for spring, it reminds me of the blooming peonies. this smocked neck top is so comfortable on a warm day, it’s loose, it has a lovely drape and is a dream to wear. paired with white shorts from Ann Taylor, the color pops even more. my top matches today’s blueberry vodka spritz!
the bright white of my shorts just makes the whole outfit feel like summer is here. i purchased these leather strappy sandals last summer and i really like how minimal they are, yet totally comfortable. they have fun stud details along the straps which a little something extra to their simplicity.

blouse | boardwalk shorts | similar sandals 1| similar sandals 2


memorial day cookout
i set up a buffet table on the patio with iced tea, water infused with lemon and an ice bucket with wine. with our cutlery and melamine dinnerware in place, we’re ready for a memorial day cookout– family style!

drink dispenser 1 | drink dispenser 2 | outdoor dinnerware | melamine plates | cutlery | caddy | outdoor drinkware | drink dispenser stand


drink dispenser stand | drink dispenser | melamine plates | melamine serving platter

honey garlic soy grilled pork chops and haricot verts with shallots and pine nuts
this is an easy recipe and the marinade goes great with any protein you like. pork chops were one of mr. style’s favorites. and crunchy sauteed haricot verts are a perfect compliment to the rich pork. i let the boneless pork chops marinate overnight, which made for juicy, well-flavored chops.

honey, garlic, soy pork chops
- 1/4 cup honey
- 3/4 cup soy sauce
- 1/4 cup rice vinegar
- 2 garlic cloves, minced
- red pepper flakes (optional)
- 4-6 boneless pork chops
-
pour all ingredients into a large ziplock bag or bowl, add pork chops and cover. let marinate for at least 2 hours or overnight.
-
brush your grill with oil to prevent sticking. over a medium flame, grill for about 6-8 minutes on each side. pork chops are done when they reach an internal temperature of 145 degrees.


the haricot verts are delicious served at room temperature, or cold so you can make these ahead of time and focus on the grill.
haricot verts with shallots and pine nuts
- 1 package haricots verts
- 1 large shallot, finely sliced
- 1/2 cup pine nuts
-
heat a tablespoon of olive oil or butter over medium heat and add finely sliced shallots. saute the shallots until they are translucent and add the haricots vert. sprinkle a generous pinch of kosher salt.
-
saute until the green beans are barely al dente, about 3-5 minutes. toss in the pine nuts and saute for another minute or until the pine nuts are toasty and golden. add cracked black pepper and more salt to taste.

blueberry vodka spritz
how pretty is this cocktail!? such a gorgeous shade of pink, it goes so well with my flowers! a light and flavorful cocktail for warmer weather, you can adjust the ratios for a low abv spritz, or swap white wine for the vodka. you can omit the vodka altogether, swap in lemonade for a mocktail version.

blueberry vodka spritz
- 4 oz sparkling water
- 1 oz fresh squeezed lemon juice
- 2 oz blueberry simple syrup
- 1.5 oz vodka
- lemon slices (garnish)
-
to an ice filled shaker, add vodka, lemon juice and blueberry simple syrup. shake and strain into an ice filled glass, top with sparkling water, garnish with a lemon.
blueberry simple syrup
- 1 cup water
- 1 cup granulated sugar
- 1 cup blueberries (fresh or frozen)
-
combine all ingredients in a saucepan and bring to a boil. reduce heat and simmer for about 15 minutes, until mixture thickens. strain into a bowl or jar, pressing on the berries with a wooden spoon to extract as much juice as possible. refrigerate until cool and you’re ready to use it.


fridays with oscar
junior style’s puppy, pax was here to play with oscar and distract him from having his picture taken! we have had quite a stormy, rainy week here in athens, but tomorrow looks to be sunny and warm, which is a welcome change! then more storms are predicted…it looks as though spring came in and is going out like a lion this year. below, i have selected a number of great items for the home, on sale this memorial day weekend, be sure to check it out. i hope you have a bit of sunshine where you are this memorial day. ollie, oscar and i wish all of you a lovely weekend!


memorial day weekend sales
Hello and happy Saturday! Welcome back to Kelly’s Kitchen, I am happy you’re here. Today is May 2nd, it’s my Mom’s birthday (Happy Birthday, Mom!). She and my husband are having a virtual, long-distance brisket smoke-off today. We will cover how that goes next week… We are a few days away from Cinco de Mayo. I love Cinco de Mayo. As if I needed any reason to eat too much Mexican food or enjoy a couple margaritas, the occasion of Cinco de Mayo just puts us all on the same page for a day. For me, growing up, Cinco de Mayo meant tamales and piñatas (read: CANDY). This week, my intention was to make tamales for y’all, but you need masa for tamales and much like flour at the grocery store, it seems masa is in high demand. Unable to procure masa, I decided to make an enchilada casserole. Not a typical Mexican dish…but, eh, well, these aren’t typical times. So instead, I’m going to show you how to make an enchilada casserole.

Cinco de Mayo is fervently celebrated in the US and many of us don’t know exactly why. A lot of Americans think it’s Mexico’s Independence Day, but actually it’s the Anniversary of the Battle of Puebla. In 1862, the Mexican military defeated the French forces of Napoleon III.
How to make an enchilada casserole
I pretty much threw this one together like a Mexican lasagne; I loosely based what I did on a recipe from Gimme Some Oven. I used some leftover brisket my husband smoked on the smoker a couple weeks ago. I knew I wanted to use it for something, so I froze a bag of the sliced brisket. Other than that, I used a couple cans of beans I had in the pantry – black beans and chickpeas. A can of corn, corn tortillas and a pre-shredded Mexican cheese blend. The enchilada sauce though, I did make from scratch. You can definitely use store-bought. You’ll need somewhere in the neighborhood of 4 cups.
For the enchilada sauce, Gimme Some Oven has a simple recipe, it’s super easy provided you have chile powder…which I only kind-of have. I have chile powders of all sorts, but strangely, not plain ol’ American chile powder, which is a very mild chile powder (note to self: buy plain ol’ chile powder!). So I improvised with 4 tablespoons of Chipotle chile powder. I offset the heat by adding about a tablespoon of Agave syrup.
I think this modification worked out because my meat was a smoked brisket so the smokiness of the Chipotle powder went well with the smoked meat. It all thickened up just fine, so I don’t think the Agave messed anything up, it just mellowed the spice of the chile powder.
Feel free to experiment with whatever you have (I did, and it all worked out ok!). Just be sure you don’t substitute chile powder with cayenne. Cayenne will make the sauce WAY too hot! I made a double batch of this sauce and I ended up with about ¾ cup leftover, which would be a great sauce or marinade for chicken. Here’s Gimme Some Oven’s recipe for homemade enchilada sauce:
Red Enchilada Sauce
- 2 tbsp Neutral-tasting Oil (Olive oil, Avocado oil, Grapeseed oil…)
- 2 tbsp Flour (Can be subbed with GF Flour )
- 4 tbsp Chile Powder (Not Cayenne!)
- 1/2 tsp Garlic Powder
- 1/2 tsp Salt
- 1/4 tsp Ground Cumin
- 1/4 tsp Dried Oregano
- 2 cups Chicken or Vegetable Stock
¡How to make Enchilada Casserole!
Step 1: Preheat your oven to 375 degrees and get your 9×13 oven safe baking dish (if yours is prone to sticking, spray with a light coat of cooking spray).
Step 2: Dice your onion and bell pepper. Use whatever color you have: red, yellow or white onion; green, yellow, orange or red bell pepper.

Dish Towel | Cutting Board | Batter Bowl | Le Creuset Baking Dish
Step 3: Open and rinse your beans and corn. I just do it all in a single colander.
Step 4: Dice, shred or cube your protein. Like I mentioned, I am using leftover brisket, but you can use chicken, pork, chorizo, tofu whatever you like – whatever you have. If you’re using meat, just be sure it’s already cooked through.

Step 5: On medium high heat, add 2 tablespoons or so of your olive oil to a large pot or dutch oven. Then add your onion and bell pepper. Cook until just soft.

Lodge Dutch Oven | Wooden Utensil Set
Step 6: Add your beans, corn and meat. Stir to combine and let cook for about 5 minutes, then add 2-3 cups of your enchilada sauce (add as much or as little as you like, since my sauce is pretty spicy, I kept it to 2 ½ cups). Stir to combine and cook long enough to let your meat warm through. Then remove from heat.

Step 7: Pour about ½ cup of the enchilada sauce in the bottom of your baking dish and tilt your dish to coat the entire bottom with sauce. Add more sauce if needed.

Baking Dish | Ball Vintage Canning Jar | Dish Towel
Step 8: Slice your tortillas in half (to fit better in the rectangular dish) and use about 6-7 halves to cover the sauce.

Step 9: Cover the tortilla layer with a layer of your meat and veg mixture.

Lodge Dutch Oven | Dish Towel | Cutting Board | Baking Dish | Ball Vintage Canning Jar | Wooden Utensil Set
Step 10: Then, cover the meat and veg layer with a layer of the shredded cheese.

Repeat steps 8-10 three more times, until you reach the top of your baking dish, finishing with another generous pour of sauce and another sprinkling of cheese.
Time to bake! Bake covered at 375 degrees for 20 minutes. Then uncover and bake for an additional 15 minutes or until the cheese on top is bubbly and browning.
When the top is done to your liking, remove from the oven and let cool for about 10 minutes.

Top with cilantro, pickled jalapeños, or scallions, or olives…whatever you like!
I topped with cilantro and then set out sour cream, homemade pickled onions, hot sauce, limes and avocado.

Le Creuset Baking Dish | Dish Towel | Cutting Board | Chip and Dip
I also set out chips and homemade pico de gallo. Homemade pico is so easy! Take a tomato and remove the seeds. Then dice it up with onion, jalapeño and garlic in whatever ratio you want or have, add a squeeze of lime and a good pinch of salt, stir and it’s done!


Enchilada Casserole
- 1 tbsp Oilve Oil
- 1 Diced Onion
- 1 Diced Bell Pepper
- 2 cans Beans (Black, Pinto, Chickpea…)
- 1 can Corn
- 3 cups Protein of your choosing (Chicken, Beef, Pork, Tofu…)
- 2-3 cups Red Enchilada Sauce
- 12 Corn Tortillas (Halved)
- 3 cups Shredded Cheese (Cheddar, Jack, Mexican Blend…)
I hope you fix yourself a margarita and have a festive Cinco de Mayo. Give this enchilada casserole a try. It’s definitely a crowd pleaser, and if you don’t have a crowd in your household, the leftovers are delicious and will freeze super well! Thank you for stopping by today, I appreciate all your wonderful support. Don’t forget, you can also find me on facebook and instagram. Thanks so much – I look forward to seeing you again next week! Take care and be well everyone. xo Kelly

Le Creuset Baking Dish | Cutting Board | Chip and Dip | Striped Table Throw


newsletter sign up
get
delivered right
to your inbox!
style