

Hi friends! I am super excited about today’s recipe. The idea for it comes from my Dad, who lives in Northern California. Each year, he and his wife count the days until it’s Hatch chile season. So this year when he told me they got their shipment from New Mexico, I had to wonder if I would be able to get them easily in Athens, Georgia. Well, I was able to get them locally. (thank you, Trader Joe’s!) So today, it’s my take on Chile Relleno.
Hatch chiles are similar to Anaheim chiles, but are native to the Hatch Valley in New Mexico. They are prized for their spicy sweet flavor and you can get them in a range from hot to mild. Mild is best for making chile relleno. So if you can’t find them, an Anaheim chile will work just fine.
My Take on Chile Relleno
I am going a little rogue with this Mexican dish: I am stuffing them with chorizo and jack cheese, and adding panko to the breading for a nice crispy crust.
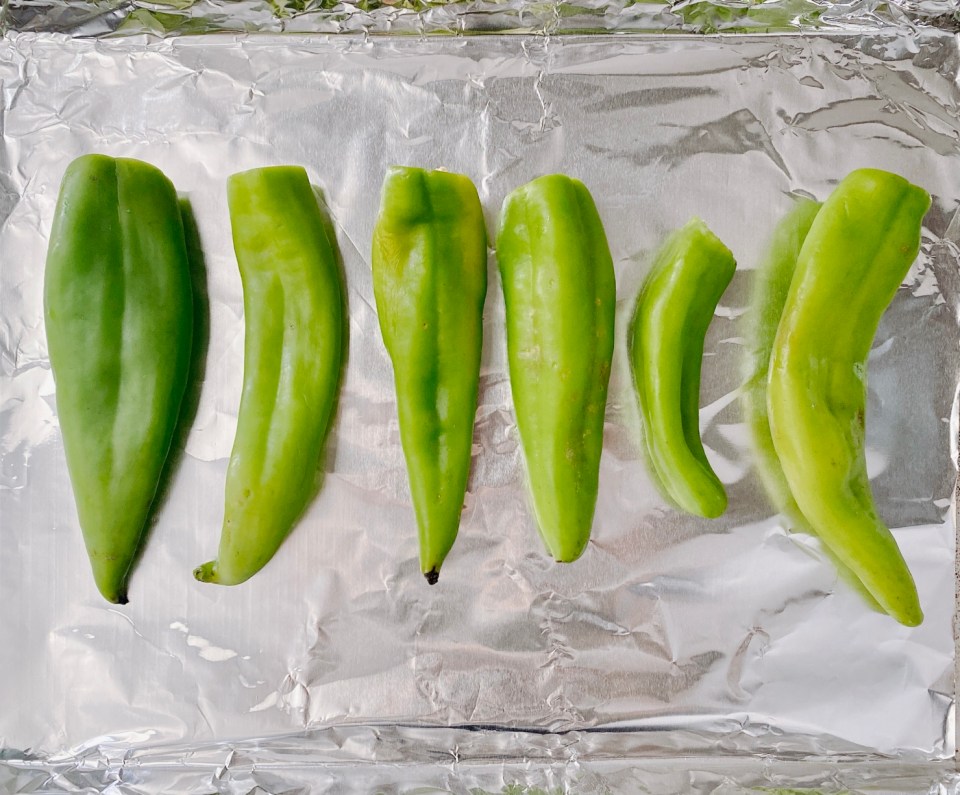
But first I need to roast the chiles. I cut their tops off, set them out on a sheet tray and broiled them on each side until they were bubbly and had a nice char to them. Just put them in and keep an eye on them, they go pretty quick.

Then put them in a Ziplock for just 15 minutes and the steam will soften the chile so they are easy to peel.

Then, carefully peel off the skin and remove the seeds. I didn’t bother with removing them altogether, I just got rid of the main cluster of them at the top of each chile.

Rest of the Prep

I had some leftover grilled tomatoes from Joojeh Kabob we made over the weekend, so I took those charred grilled tomatoes and I pureed them with two of the smallest roasted Hatch chiles I had. Then I rough chopped one yellow onion, 5 cloves of fresh garlic, and a good handful of cilantro (stems and leaves) in the food processor. I also added a glug of olive oil.

I mixed the onion, garlic, cilantro mixture into the tomatoes and added lime juice (half a lime) and Kosher salt to taste. Set it aside to let the flavors hang out a bit.

Then it’s on to the chorizo. This is Mexican chorizo which is a soft sausage. It comes in a casing that you remove and cook it like ground meat. I am using 8 ounces of chorizo. The brand I get is portioned out in 2 ounce sausage links, but otherwise you can make the whole package and save what you don’t use for breakfast tomorrow! Chorizo and eggs in a tortilla is THE BEST breakfast. (just sayin’)

The chorizo cooks pretty quickly over medium high heat. It’s done when the texture is crumbly and it’s slightly more brown than red. Use a slotted spoon to remove chorizo from the pan and let it drain on a few folded paper towels.

I am using pre-shredded Monterey Jack cheese. To make filling the chiles easier, I mixed my shredded cheese with the cooked chorizo ahead. This made the possibility of tearing the chile as I filled it less of an issue.
For toppings, I have chopped cilantro, sliced scallion, avocado and Cotija cheese. All of this is optional, but really goes nicely, especially with the roasted tomato salsa.

Making the Relleno
Take your chile and slice a slit down the center. If you can, try not to cut it all the way to the bottom. Only go as far as you have to to get filling into the bottom without compromising the chile.
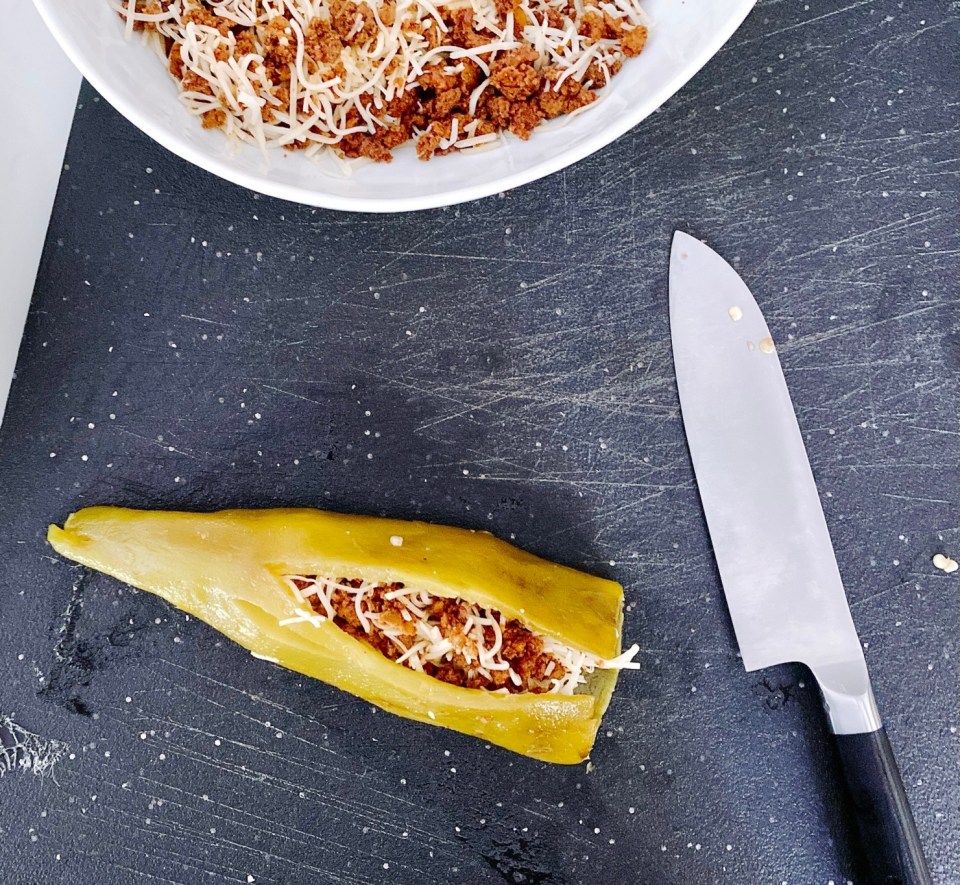
My mixture is pretty crumbly so I decided to hedge and use toothpicks to help keep it closed.

The Set Up
Set up your breading station right to left: prepared chiles; then in shallow bowls, ½ – 1 cup all purpose flour, 1-2 beaten eggs, ½ -1 cup panko. Then finally, a sheet tray with a wire rack placed inside.

A note on the ratios: I usually go for the higher quantities for the dredge because nothing is worse than having to break your assembly stride to beat more egg. So I used: 2 eggs, 1 cup flour and 1 cup panko. I definitely had leftover, but that was ok.
Also think ahead on your fry station set up. Go right to left. I have my breaded chiles; then my dutch oven filled with about a ½ inch of grapeseed oil, heating to 350 degrees. I turn my burner on low to get the oil going while I fill and bread my chiles. Then I turn the burner up to medium high once I am ready with the chiles.

Then I have my landing tray: another sheet tray lined with a wire rack. This will keep your rellenos from getting soggy bottoms while they cool.
Tools to have
If you don’t already have one, you must get a fish spatula for a job like this. It is life-changing! Another great tool is a pair of large chef’s tweezer-style tongs. They have a very pointy tip which makes turning the chiles much easier because you don’t have gangly tong tips accidentally scraping off any of your panko crust. Also, have your handy thermometer to read the oil temp.
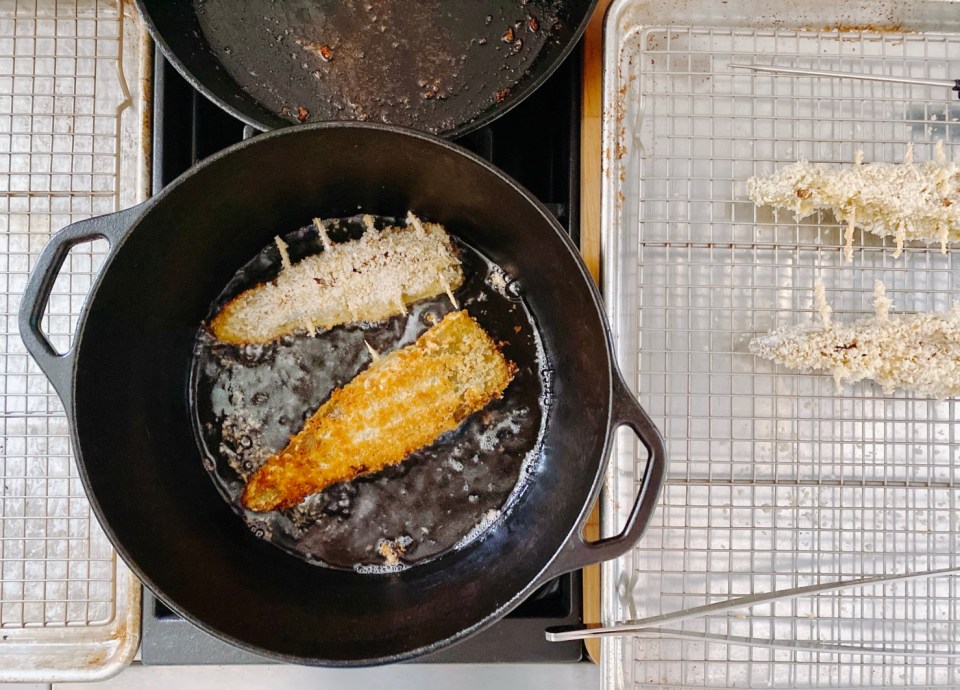
When your oil is hot, gently lay in one chile at a time, with a maximum of two in the pot. after about 3 minutes, check the bottoms, and if they are golden brown flip them over.
To flip: in your right hand use your fish spatula to lift up one side of the chile. With your left hand use your tongs to gently help scoot the chile onto the fish spatula. With your fish spatula hand, slowly flip the chile over onto the tong arms and then gently pull out your tongs from under the chile.
Repeat this process for the four chiles.

Once slightly cool, pull out your toothpicks and plate up your Hatch Chile Rellenos!


You guys, I have to say I haven’t made these before because they have never been my favorite Mexican dish. I think usually at restaurants, they’re always too cheesy and too soggy. But when my Dad got all excited about making chile relleno with his Hatch chiles, I had to try my hand at it.

Dad, if you’re reading this, thank you so much for today’s recipe inspiration! And thank you, everyone for spending some of your Saturday with me this week. Don’t forget you can find me on Instagram and Facebook too! Take care everyone, be well. xo Kelly

Hatch Chile Relleno with Chorizo and Panko
Tomato Salsa
- 2-5 Roasted Tomatos
- 1-2 Roasted Hatch Chiles, skins removed
- 1 Small to Medium Onion
- 4-6 Fresh Garlic Cloves
- Kosher Salt to taste
- Juice from 1/2 Lime
- 1/4 Bunch of Cilantro, stems and leaves
- 1 tbsp Olive Oil
Chile Relleno
- 4-6 Large Hatch Chiles or Anaheim Chiles
- 8-10 oz Mexican Chorizo, cooked
- 1/2-1 cup Shredded Monterey Jack Cheese
- 1/2-1 cup All Purpose Flour
- 1-2 Eggs, beaten
- 1/2-1 cup Panko
- 1/2" Grapeseed or vegetable oil in a large skillet or Dutch oven
- Sliced Avocado, optional topping
- Cilantro, optional topping
- Cotija Cheese, optional topping
Tomato Salsa
-
Purèe tomatoes and Hatch chiles to a chunky salsa consistency. Transfer to a bowl and set aside
-
Rough chop onion. Peel and smash garlic cloves. Add cilantro, onions, garlic and olive oil to food processor. Process to a chunky salsa consistency.
-
Stir onion garlic mixture into tomato chile mixture, add lime juice and season with Kosher salt to taste.
Chile Relleno
-
Broil chiles until they are blistered and charred on both sides. Put chiles in a Ziplock and let them steam for 15 minutes.
-
Cut off chile stems and remove seeds. Carefully peel the charred skin off of the chiles. Set aside.
-
Cook your chorizo until the sausage is crumbly and browned. Using a slotted spoon transfer the chorizo to a paper towel-lined plate to drain.
-
Prepare your dredge station with shallow bowls with flour, egg and panko.
-
Prepare your fry station with 1/2" grapeseed or vegetable oil in a large skillet or Dutch oven. Turn your burner on low.
-
Mix your cooked chorizo and cheese and set near your dredge station.
-
Slice each chile down the center only long enough to easily fill with filling. Gently fill each chile with filling and close the chile with toothpicks. Repeat with each chile.
-
One chile at a time, carefully dredge each chile in the flour, then the egg, then the panko.
-
Turn up the heat on your burner to medium high to get the oil to 350 degrees. Then carefully place two chiles in the oil, frying for about 3-5 minutes on each side, until golden brown. Adjust burner temp to maintain 350 degrees. Repeat for remaining chiles.
-
Remove toothpicks from each chile, plate with toppings and whatever sides you like.
Hello friends! Welcome back to Kelly’s Kitchen. You all probably remember that Beth had a birthday a couple weeks ago. What you didn’t know is that her oldest, my husband Alex, and Junior Style also have August birthdays. We celebrated with an Alaskan King Crab boil! Well, sort of…the potatoes, Andouille sausage, onions and corn were boiled separately with Old Bay seasoning. The crab legs were steamed on their own. (Because you just don’t need to mess with Alaskan King Crab!) It was absolutely wonderful – and we had a ton of leftovers.
Leftovers, Take: 1
Last Sunday at our family brunch, I made homestyle potatoes with a good amount of the leftover potatoes and the Andouille. I also made scrambled eggs topped with the rest of the crab. But I had a lot of corn on the cob and potatoes still left over. So today, we are making Potato and Corn Soup. Perfect for now and for freezing to enjoy this winter.
Leftovers, Take: 2
Now, I realize that ya’ll probably don’t have pounds of leftover low country boil hogging up space in your fridge – not to worry, the recipe card will be for starting from scratch. But I thought it would be fun to share with you how I like to adapt recipes to fit my leftover situations. I do it all the time in fact, it’s probably my favorite way to cook – I love the challenge!

I have two sets of potato leftovers: the original boil potatoes and the homestyle potatoes which were crisped up on a griddle with a generous sprinkling of thyme and oregano, salt, pepper and drizzled with butter. The boil potatoes will be pureed with about half the corn, while the griddle potatoes will go into the soup after it’s blended (same with the bacon, fresh jalapeños and remaining corn).
I started by baking the bacon in a 350 oven until cooked through with crisp edges. While the bacon cooked, I de-corned my little corn cobs.

All of the boil potatoes (and boil onions) and half the corn went into a stock pot with 34 ounces of turkey bone broth. (2 cartons, 17 ounces each of Trader Joe’s Turkey Bone Broth). My potatoes are already cooked, so all I want to do here is get the pot to a boil and let it simmer until the potatoes are warmed through and squishy.

With the heat turned off, I used my immersion blender to puree the potatoes and corn. I added a generous sprinkling of salt, pepper and Old Bay seasoning.

I blended it to a good consistency, then I added half a cup of milk to smooth it all out a bit more. Then I poured the whole thing into my 12-quart Cambro to give myself more room to stir in the griddle potatoes, the remaining half of the corn, diced jalapeños and the cooked, chopped bacon (if you like, reserve some of the chopped bacon to use as a garnish for each bowl).

Soup’s On!
Ladle the soup into bowls and top with reserved bacon and chopped flat leaf parsley. And just like that, you’ve made some humble leftovers that no one thought you’d finish into a delicious soup that will freeze well for winter. You will be reminded of the amazing crab boil you had in August… Or maybe that’s just me…but anyway, Mission Accomplished!


Going back to the original meal (King Crab Boil), if you’re interested in King Crab and don’t happen to live where it’s abundant, or if it’s off season, I highly recommend ordering from 10th and M Seafoods in Anchorage Alaska. Many moons ago when I was in advertising, they were a client of mine. Over the years since then, I have always ordered hard-to-find-in-the-Lower-48 Alaskan seafood from them. They ship Fedex overnight and the quality is always outstanding!
Thanks everyone for joining me today! Don’t forget you can find me on Instagram and Facebook too. Another great dish to get creative with leftovers is chicken salad! let me know what you like to make with leftovers. See you soon! Take care, be well, xo Kelly

Potato and Corn Soup
- 8 slices Cooked, chopped bacon
- 1.5-2 lbs Small Red Potatoes
- 8 ears Corn, sliced off the cob, or 1 bag of frozen corn
- 2 tbsp Salted Butter
- 2 cloves Garlic, minced
- 1 diced Onion
- 5 cups Chicken Broth, or water
- 1/2-1 cup Milk, cream or half and half
- Salt and pepper to taste
- Old Bay seasoning to taste
- Fresh jalapeño slices (optional)
-
Bake bacon a 350 degree oven until crispy.
-
Slice corn off cobs and set aside.
-
Cut potatoes into 1" pieces.
-
Take 1 tbsp of bacon grease and the 2 tbsp butter and melt in a soup pot over medium heat.
-
Add onions and garlic and cook just until translucent.
-
Add corn, potatoes, broth and seasonings.
-
Bring to a boil and simmer about 15-20 minutes, until potatoes are fork tender.
-
Turn off heat and remove 1/4 – 1/2 of potatoes and corn and set aside.
-
Use an immersion blender to puree the remaining soup in the pot.
-
Add milk and continue blending until desired consistency is achieved. Add more milk if necessary to get a smooth consistency.
-
Taste and season with more salt, pepper or Old Bay if needed.
-
Add the reserved potatoes, corn, chopped bacon and jalapeño slices, stir to combine.
-
Ladle into bowls, top with more bacon, or cheese, scallions, or parsley…whatever you like!
It’s a bit extra, but if you want even more flavor and texture, take your reserved potatoes and crisp them up in a skillet with some butter, thyme and oregano before adding them to the pureed soup.
Hi everyone, welcome to Kelly’s Kitchen. It’s great you’re here today. This week, Alex asked to make Joojeh Kabob, which is a Persian Chicken Kabob. We haven’t had Persian food since we left California, so I thought this would be a good one to try.
Joojeh Kabob is typically served with grilled tomatoes and onions. We also grilled some lavash and I made some plain old rice. (We’ll save Tahdig for another post!) Our intention was to let the chicken marinate overnight, but because of all the rain this week, we put it off another day, so the chicken marinated for two days – which turned out perfectly.
Day 1 Marinade

This marinade is easy! It does call for quite a bit of saffron, half a teaspoon (which is about 1.4 grams). The strands are easy to pulverize. But if you don’t have a mortar and pestle, you can use the butt of your chef’s knife and a bowl. The marinade calls for half of the saffron water mixture. The remaining half will be part of the basting sauce.


Just mix the ingredients in a bowl. Add the cubed chicken, toss to coat. Then I poured the whole thing into a Ziplock, squeezed out the air and popped it in the fridge.

Day 2 (or 3) Grilling
Take out your chicken and get your grill going. While the grill heats up and the meat comes to room temperature, prep your veggies. I halved the tomatoes and cut the onion into eighths. Go ahead and start your rice (Basmati is best for this dish.)

The basting sauce is simply, lemon juice, butter and the remaining saffron water. combined and warmed through in a saucepan on the stove.

Researching grilling techniques for kabobs led us to discover a couple things: 1) definitely use flat skewers to keep your food from spinning on the skewer. 2) to get the best charring on your food, if you can, avoid using a grill altogether and let your kabobs sit directly over the coals. This required us to double thread the food to get longer skewers. It’s no problem if you can’t go this route, your kebabs will still be delicious if you cook them on grill grates.

Try to keep as many of the onions from the marinade on the chicken as you can when you thread the chicken. They will caramelize beautifully!
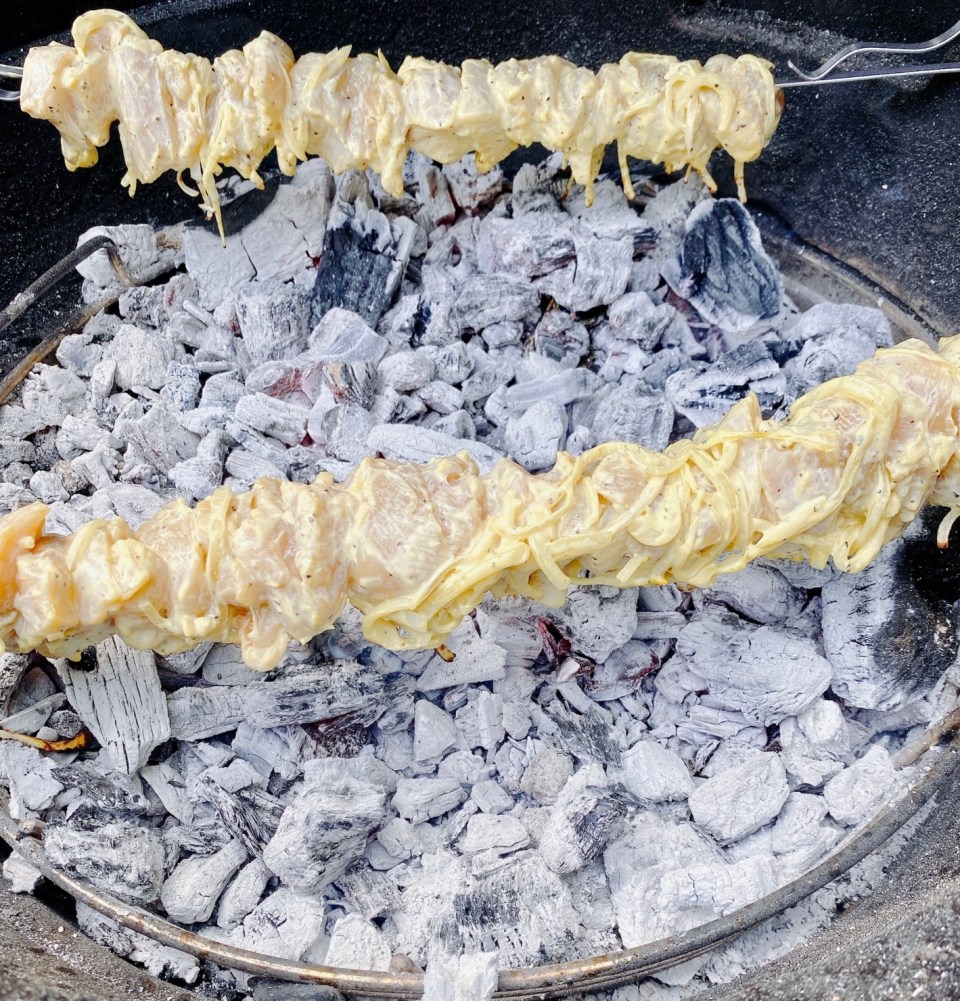
Our kettle grill is quite large, so this set up may easier for you if you have a standard size charcoal grill. Grill your kabobs for about 4-6 minutes each side, basting after the first turn then every minute until the chicken is done.
We found that doing the chicken this way first, then placing the grill grates on for the tomatoes and onions was an easier way to get an even cook on the tomatoes and onions.

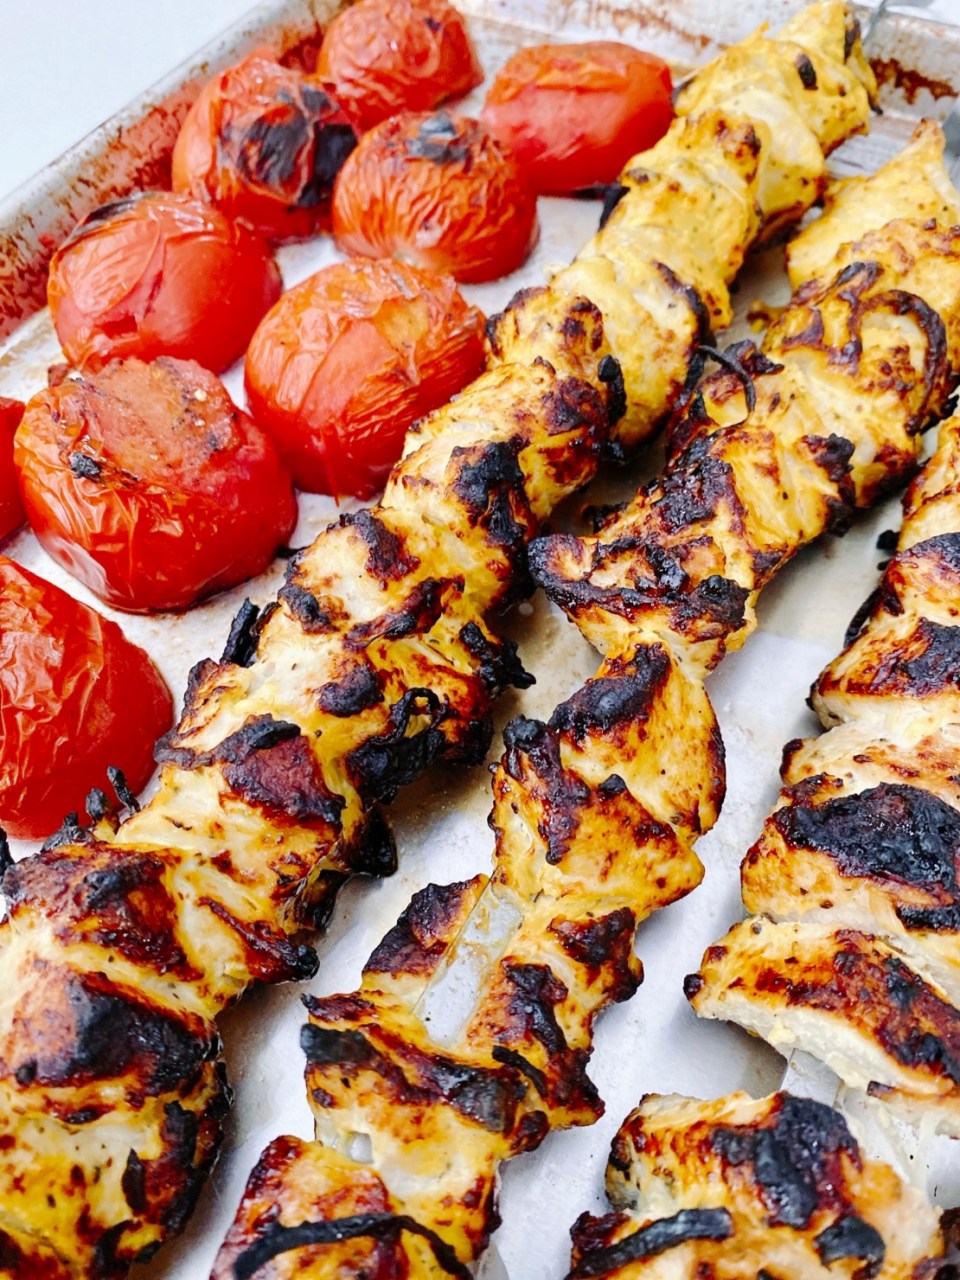

I plated the Joojeh Kabobs on a bed of rice; add tomatoes, onions and lavash. I also added some Israeli feta and parsley from the garden. The saffron is the real star of this recipe. Saffron lends a deep honey flavor, only it’s not sweet. It tastes like how honey smells, if that makes sense…. The smoky flavor from the charcoal combines with the saffron for a unique and distinct harmony of flavors.

Persian cuisine is one our favorites and I look forward to sharing more of our favorite Persian dishes with you! I do hope you give Joojeh Kabob (Persian Chicken Kabab) a try! They are simple to make and they are a wonderful way to experience the flavors of Iran.
Thank you so much for joining me today! Don’t forget you can find me on Instagram and Facebook too! Also, let me know if there is anything in particular you’d like to explore in this weekly column. Take care, be well, xo Kelly

Joojeh Kabob (Persian Chicken Kabob)
- 3.5 lb Boneless, Skinless Chicken Breast
- 2 Onions, thinly sliced
- 1/2 tsp Saffron, ground and dissolved in 2 tbsp hot water
- 1/2 cup Plain Yogurt
- 2 tbsp Olive Oil, EVOO
- 2 cloves Garlic, smashed and chopped
- 1.5 tsp Kosher Salt
- 1.5 tsp Ground Black Pepper
- 1/4 cup Unsalted Butter
- 1/4 cup Lemon Juice
- Rice, Lavash, Feta, Parsley, Grilled Onions and Tomatoes (optional serving suggestions)
-
Cut chicken into 2-inch cubes.
-
Place chicken in a large shallow container and mix in onions, half the saffron water, yogurt, olive oil, garlic, salt and pepper.
-
Coat all pieces of chicken completely with marinade
-
Cover (or transfer to a Ziplock) and marinate at least 6 hours and up to 2 days in the refrigerator.
-
Start your charcoal at least 30 minutes prior to grilling.
-
Thread chicken breast pieces close together onto metal skewers.
-
In a small saucepan add butter, lemon juice and the other half of saffron water. Cook this over medium heat until melted and combined.
-
Grill kabobs for 4-5 minutes on each side, basting with butter-lemon mix.
-
The chicken is done when the juice running out is no longer pink.
-
Let chicken rest about 5 minutes and slide off skewer.
-
Serve over rice with lavash, tomatoes and onions.
Welcome back to Kelly’s Kitchen! I am happy you’re here. Today is National BBQ Day, and what better way to celebrate than by grilling out. Alex and I have spent a fair amount of time so far this spring practicing grilling and smoking on our Big Green Egg. We have had some hits and some misses (read: the brisket a couple weeks ago!), but we are learning a lot and enjoying it all the way. But we had a hit this week and wanted to share with you how to make Alabama-style bbq.

When we were still in California, we lived in an apartment which had a balcony, and we had a very crappy gas grill. We grilled all the time; struggling though its very small size and keeping a consistent temperature. And then it finally just broke. Right at the beginning of last summer. Since we were planning to move to Athens at the end of the summer, we didn’t bother to replace it and instead just longed for the day we’d be in our new home, with a proper grill.
That time has finally arrived and we couldn’t be happier! Alex has become interested in regional BBQ styles and suggested we try an Alabama-style white BBQ sauce this week. This white BBQ sauce is mayonnaise-based, traditionally served on smoked chicken. Alex is a mayo-fanatic so, to really satisfy his mayonnaise crush, I went maybe one too far and made an Elote-style sauce (featuring mayo!) for corn on the cob.
How to Make Alabama-style White BBQ Sauce
We chose to spatchcock a whole chicken, but you can do your favorite cuts of chicken, if you like. We are smoking the bird to capture the traditional experience, but you can just grill it if you’re not able to smoke it.
Spatchcock Step 1: Using kitchen shears, cut along each side of the chicken spine and remove the spine.

Spatchcock Step 2: Flip the bird over, breast side up and pull the two sides out to flatten the chicken. Season with kosher salt, black pepper and garlic salt.
Spatchcock Step 3 (optional): Lay a pile of fresh herbs on a wire rack and place your chicken on the herbs. We used fresh rosemary and thyme. You can do this if you are using pieces too, it just adds a fresh herby flavor to the chicken that goes nicely with the smoke from the grill.


This will be an indirect cook, meaning the chicken will not be directly over the flame. You can easily do this in a gas grill by only firing up one side and placing the chicken on the opposite side. Or if you have a cast iron griddle, you can place that on the grill and put your wire rack and chicken on top of it. Alex uses a cast iron plate* which goes above the flame, but below the grill, this plate radiates the heat from the flame, without the flames hitting the bird.
*Editor’s note: This plate is actually ceramic! It’s so blackened I assumed it was cast iron. Anywho….
Spatchcock Step 4: Get your grill up to 315 degrees. We will hold this temp and cook the bird for 90 minutes.
Spatchcock Step 5: Place your wire rack with the herbs and chicken on the grill.

Spatchcock Step 6: Rotate the wire rack and bird 90 degrees, halfway through the cook.

Meanwhile, let’s make the sauce

Similar Ceramic Mixing Bowl | Measuring Glass | Citrus Juicer
Alabama-Style White BBQ Sauce
- 1 cup Mayonnaise
- 1/4 cup Apple Cider Vinegar
- 2 tbsp Brown Sugar
- 1 tbsp Brown Mustard
- 1 tsp Lemon Juice
- 1 tsp Prepared Horseradish
- 1/2 tsp Kosher Salt
- 1/2 tsp Black Pepper
- 1/4 tsp Cayenne Pepper
Sauce Step 1: Whisk all ingredients together!


This style of white BBQ sauce was created sometime in the early 1920’s by Bob Gibson in Decatur, Alabama. It is speculated that the mayonnaise-based sauce came about as a way to keep the chicken moist after it came off the pit, the fat in the mayo would act as a buffer. At Big Bob Gibson Bar-B-Q restaurants, they dunk the whole chicken into the sauce when it comes out of the pit. The white sauce has gained popularity on grilled vegetables and as a chip dip.
Side Dish

Elote is a Mexican street food: an ear of corn on a stick grilled, then coated in a creamy, cheesy sauce with spices and cilantro.
Earlier, I referred to the corn topping as an Elote-Style sauce because typically Elote is made with equal parts sour cream and mayonnaise with grated Cotija cheese. Well, I didn’t have sour cream and I had queso fresco, not Cotija. Cotija is a sharp salty cheese, while queso fresco is more mild. Not to be deterred by missing ingredients, I simply made some modifications!

Dish Towel | Whisk | 4 Cup Measuring Cup | Bamboo Cutting Board
Elote Sauce Step 1: Whisk together ½ cup Mayonnaise, juice from ½ of a lime, ¼ cup crumbled queso fresco and about ½ to 1 tablespoon of Everything But The Elote spice blend.
A note on the spices: I am using Everything But The Elote, a spice blend made by Trader Joe’s. In place of this you can create a spice blend with 1 teaspoon each of: chile powder, chipotle powder (or try smoked paprika), cumin, garlic powder, grated parmesan cheese and sea salt. Give it a taste and make adjustments as you like.
By now your chicken should be just about to temp, 165 degrees for the breast, 175 degrees for the dark meat. When you pull your chicken off the grill, tent it with foil and let it rest for at least 10 minutes. Throw your corn on the grill while your chicken rests.

Carve up your chicken and arrange on a platter. Pour Alabama-Style sauce over the chicken and garnish with green onions.

Pull your corn off the grill. Arrange on a plate and pour the Elote-Style sauce over the corn. Sprinkle with more cheese crumbles and fresh cilantro.


This was a fun experiment for us since we never had Alabama-style white sauce before. I was skeptical, given my experience with tomato, or vinegar-based BBQ sauce I didn’t feel like a mayo-based sauce could count as a BBQ sauce. But on smoked chicken, it doesn’t lose any BBQ-ness. You still get a nice tang, a little spiciness, and an added richness – which is what makes this a unique flavor experience. We made a double batch of the white sauce and have used it on burgers and I made deviled eggs with it instead of using plain mayo. So go ahead and make some extra, you will find yourself using it for more than smoked chicken!

Stoneware Rimmed Plate | Drinking Glass | Similar Linen Napkin
Thank you all for joining me this week. I hope you give this recipe a try. If you aren’t up for grilling a chicken, make the sauce and try it out on other things! If you like mayonnaise, I am sure you will like it on burgers, sandwiches and veggies. Have a great weekend everyone, take care and be well. xo Kelly

Hello and happy Saturday! Welcome back to Kelly’s Kitchen, I am happy you’re here. Today is May 2nd, it’s my Mom’s birthday (Happy Birthday, Mom!). She and my husband are having a virtual, long-distance brisket smoke-off today. We will cover how that goes next week… We are a few days away from Cinco de Mayo. I love Cinco de Mayo. As if I needed any reason to eat too much Mexican food or enjoy a couple margaritas, the occasion of Cinco de Mayo just puts us all on the same page for a day. For me, growing up, Cinco de Mayo meant tamales and piñatas (read: CANDY). This week, my intention was to make tamales for y’all, but you need masa for tamales and much like flour at the grocery store, it seems masa is in high demand. Unable to procure masa, I decided to make an enchilada casserole. Not a typical Mexican dish…but, eh, well, these aren’t typical times. So instead, I’m going to show you how to make an enchilada casserole.

Cinco de Mayo is fervently celebrated in the US and many of us don’t know exactly why. A lot of Americans think it’s Mexico’s Independence Day, but actually it’s the Anniversary of the Battle of Puebla. In 1862, the Mexican military defeated the French forces of Napoleon III.
How to make an enchilada casserole
I pretty much threw this one together like a Mexican lasagne; I loosely based what I did on a recipe from Gimme Some Oven. I used some leftover brisket my husband smoked on the smoker a couple weeks ago. I knew I wanted to use it for something, so I froze a bag of the sliced brisket. Other than that, I used a couple cans of beans I had in the pantry – black beans and chickpeas. A can of corn, corn tortillas and a pre-shredded Mexican cheese blend. The enchilada sauce though, I did make from scratch. You can definitely use store-bought. You’ll need somewhere in the neighborhood of 4 cups.
For the enchilada sauce, Gimme Some Oven has a simple recipe, it’s super easy provided you have chile powder…which I only kind-of have. I have chile powders of all sorts, but strangely, not plain ol’ American chile powder, which is a very mild chile powder (note to self: buy plain ol’ chile powder!). So I improvised with 4 tablespoons of Chipotle chile powder. I offset the heat by adding about a tablespoon of Agave syrup.
I think this modification worked out because my meat was a smoked brisket so the smokiness of the Chipotle powder went well with the smoked meat. It all thickened up just fine, so I don’t think the Agave messed anything up, it just mellowed the spice of the chile powder.
Feel free to experiment with whatever you have (I did, and it all worked out ok!). Just be sure you don’t substitute chile powder with cayenne. Cayenne will make the sauce WAY too hot! I made a double batch of this sauce and I ended up with about ¾ cup leftover, which would be a great sauce or marinade for chicken. Here’s Gimme Some Oven’s recipe for homemade enchilada sauce:
Red Enchilada Sauce
- 2 tbsp Neutral-tasting Oil (Olive oil, Avocado oil, Grapeseed oil…)
- 2 tbsp Flour (Can be subbed with GF Flour )
- 4 tbsp Chile Powder (Not Cayenne!)
- 1/2 tsp Garlic Powder
- 1/2 tsp Salt
- 1/4 tsp Ground Cumin
- 1/4 tsp Dried Oregano
- 2 cups Chicken or Vegetable Stock
¡How to make Enchilada Casserole!
Step 1: Preheat your oven to 375 degrees and get your 9×13 oven safe baking dish (if yours is prone to sticking, spray with a light coat of cooking spray).
Step 2: Dice your onion and bell pepper. Use whatever color you have: red, yellow or white onion; green, yellow, orange or red bell pepper.

Dish Towel | Cutting Board | Batter Bowl | Le Creuset Baking Dish
Step 3: Open and rinse your beans and corn. I just do it all in a single colander.
Step 4: Dice, shred or cube your protein. Like I mentioned, I am using leftover brisket, but you can use chicken, pork, chorizo, tofu whatever you like – whatever you have. If you’re using meat, just be sure it’s already cooked through.

Step 5: On medium high heat, add 2 tablespoons or so of your olive oil to a large pot or dutch oven. Then add your onion and bell pepper. Cook until just soft.

Lodge Dutch Oven | Wooden Utensil Set
Step 6: Add your beans, corn and meat. Stir to combine and let cook for about 5 minutes, then add 2-3 cups of your enchilada sauce (add as much or as little as you like, since my sauce is pretty spicy, I kept it to 2 ½ cups). Stir to combine and cook long enough to let your meat warm through. Then remove from heat.

Step 7: Pour about ½ cup of the enchilada sauce in the bottom of your baking dish and tilt your dish to coat the entire bottom with sauce. Add more sauce if needed.

Baking Dish | Ball Vintage Canning Jar | Dish Towel
Step 8: Slice your tortillas in half (to fit better in the rectangular dish) and use about 6-7 halves to cover the sauce.

Step 9: Cover the tortilla layer with a layer of your meat and veg mixture.

Lodge Dutch Oven | Dish Towel | Cutting Board | Baking Dish | Ball Vintage Canning Jar | Wooden Utensil Set
Step 10: Then, cover the meat and veg layer with a layer of the shredded cheese.

Repeat steps 8-10 three more times, until you reach the top of your baking dish, finishing with another generous pour of sauce and another sprinkling of cheese.
Time to bake! Bake covered at 375 degrees for 20 minutes. Then uncover and bake for an additional 15 minutes or until the cheese on top is bubbly and browning.
When the top is done to your liking, remove from the oven and let cool for about 10 minutes.

Top with cilantro, pickled jalapeños, or scallions, or olives…whatever you like!
I topped with cilantro and then set out sour cream, homemade pickled onions, hot sauce, limes and avocado.

Le Creuset Baking Dish | Dish Towel | Cutting Board | Chip and Dip
I also set out chips and homemade pico de gallo. Homemade pico is so easy! Take a tomato and remove the seeds. Then dice it up with onion, jalapeño and garlic in whatever ratio you want or have, add a squeeze of lime and a good pinch of salt, stir and it’s done!


Enchilada Casserole
- 1 tbsp Oilve Oil
- 1 Diced Onion
- 1 Diced Bell Pepper
- 2 cans Beans (Black, Pinto, Chickpea…)
- 1 can Corn
- 3 cups Protein of your choosing (Chicken, Beef, Pork, Tofu…)
- 2-3 cups Red Enchilada Sauce
- 12 Corn Tortillas (Halved)
- 3 cups Shredded Cheese (Cheddar, Jack, Mexican Blend…)
I hope you fix yourself a margarita and have a festive Cinco de Mayo. Give this enchilada casserole a try. It’s definitely a crowd pleaser, and if you don’t have a crowd in your household, the leftovers are delicious and will freeze super well! Thank you for stopping by today, I appreciate all your wonderful support. Don’t forget, you can also find me on facebook and instagram. Thanks so much – I look forward to seeing you again next week! Take care and be well everyone. xo Kelly

Le Creuset Baking Dish | Cutting Board | Chip and Dip | Striped Table Throw
Hello and happy Saturday! Welcome back to Kelly’s Kitchen, It’s so great to see you again. Week before last, my husband and I received our first CSA (Community Supported Agriculture) box from Collective Harvest, here in Athens. This box of fresh, local produce makes me so happy! It is a joy to think of what to make with all the gorgeous veggies. We have been doing a lot of big, hearty salads with mushrooms, scallions, pepitas and anything else we can toss in. More on that in the coming weeks…. But for this week, I wanted to highlight one particular treat in our CSA box: strawberries. Early spring is the time for strawberries. And to go with our cute little basket of strawberries I wanted to make a pound cake. I found Melissa Clark’s recipe for Lemon Poppy Seed Pound Cake on the New York Times cooking site, so I thought I’d give it a go. Here’s how to make pound cake.

How to make pound cake
In reading the recipe, I noticed it calls for buttermilk. Well, I didn’t want to go out just for buttermilk. I know I can make my own by adding vinegar to some whole milk…but then I remembered my husband accidentally bought plain Kefir, instead of the plain yogurt on my shopping list a few weeks ago. Perfect!
For my strawberries, I didn’t want to go so far as to make a compote – I wanted to keep them mostly naked, but I did want a saucy-ness to them. I found an easy recipe from Bon Appetit’s latest issue to dress my berries.
Now, how about we make that cake:

Dish Towel | Microplane | Cutting Board | Batter Bowl | Loaf Pan | Measuring Cup and Mixing Bowl Set
Step 1: Preheat oven to 350 degrees. Grease and flour an 8-9 inch loaf pan.
Step 2: Combine the lemon zest and the 1 cup granulated sugar (I used organic cane sugar), massaging it together to create a sandy mixture.


Spouted Mixing Bowl Set | Whisk | Citrus Juicer | Prep Bowls
Step 3: Whisk in buttermilk (or kefir), lemon juice and 3 eggs.
Step 4: In a separate bowl, whisk together flour, salt, baking soda and baking powder
Step 5: Whisk dry ingredient mix into wet mix.

Batter Bowl | Loaf Pan | Dish Towel
Step 6: Whisk in the olive oil (it seems like A LOT, but just keep stirring until the batter is smooth and all the oil is incorporated) Then stir in your poppy seeds*.
*I think the poppy seeds can be totally optional. You can omit them and your cake will still be delicious!
Step 7: Time to bake! Place in the 350 degree oven and bake for about 1 hour, until it’s golden brown and the center top of the cake is firm.
How to dress strawberries
Meanwhile: Cut your berries into quarters or halves, depending on size and mix with a tablespoon or two of lemon juice and a pinch of salt and set aside.

Then: Heat 3 tablespoons of honey in a saucepan until bubbly.

I let my honey cool slightly then I poured it over my berries and stirred to combine. (The honey will seize up at first, but after sitting for a bit, it will dissolve in the acidic juices.*) Set aside, and stir occasionally.
*If you end up with little bits of solid honey in your berry bowl by the time you want to serve the berries, you can strain them out with a fine mesh strainer, no problem.

How to make a glaze
Also meanwhile: If you want to glaze your pound cake, take 1 cup of confectioners’ sugar and 4 teaspoons of lemon juice and mix until smooth. You can make it as thick or thin as you like by adding more lemon juice (thin) or more confectioner’s sugar (thick). Set this aside until your pound cake is cool.
Once your cake is done, set it out to cool slightly, then when it’s handle-able, turn it out on a wire rack placed over a sheet pan, turn the cake upright, and let it cool a bit more.

Sheet Pan | Wire Rack | Silicone Brush | Pyrex 4 Cup

Then use a pastry brush to brush the icing on your cake. I glazed the whole cake, even the sides. Then I did a second coat. 🙂

Let your cake cool all the way before you serve it. Slice it thick or thin, top with berries and enjoy!
PS: No one will be mad if you if you whip up some whipped cream to top it all off!
Lemon Poppy Seed Pound Cake
- 1 3/4 cup Flour
- Zest of 2 Lemons
- 1 cup Sugar
- 1/2 cup Buttermilk (or kefir!)
- 3 tbsp Lemon Juice (+ 4 Teaspoons lemon juice)
- 3 Eggs
- 1 1/2 tsp Baking Powder
- 1/4 tsp Baking Soda
- 1/4 tsp Fine Sea Salt
- 2/3 cup Extra Virgin Olive Oil
- 1 tbsp Poppy Seeds
- 1/2 cup Confectioners' Sugar
-
Heat oven to 350 degrees. Butter and flour an 8-inch loaf pan.
-
In a bowl, combine lemon zest and sugar and rub with your fingers until it looks like wet sand. Whisk in buttermilk, 3 tablespoons lemon juice and eggs. In a separate bowl, whisk together flour, baking powder, baking soda and salt. Whisk dry ingredients into the batter, then whisk in oil and poppy seeds.
-
Pour batter into prepared pan. Bake until a toothpick inserted in the center emerges clean, about 1 hour. Let cool in pan until warm to the touch, then turn out onto a baking rack set over a rimmed baking sheet. Turn cake right side up.
-
Whisk together remaining 4 teaspoons lemon and the confectioners’ sugar. Use a pastry brush to spread glaze evenly over top and sides of cake. Cool completely before slicing.
Thank you so much for stopping by today, I do hope you give this Lemon Poppy Seed Pound Cake a try, it’s so good for dessert or breakfast! Don’t forget, you can also find me on facebook and instagram. Thanks so much – I look forward to seeing you again next week! Take care and be well everyone. xo Kelly

Hello and happy Saturday! Welcome back to Kelly’s Kitchen, I’m so happy you’re here. Last week, we walked through how to make popovers. This week, I have been thinking a lot about comfort food. We all have our favorites; whether it’s a new favorite or a classic recipe from our childhood, comfort foods transport us to a place of safety, of easier times laden with memories. Comfort foods can feel like a generous warm hug, and for this reason can be therapeutic. Often times, our favorite comfort foods are not the healthiest choice. But that’s ok, because it’s likely we aren’t eating them everyday. But every now and again, it’s ok to indulge. And this makes them even more special! So join me today and learn how to make a skillet pizza.

how to make a skillet pizza
Pizza IS one of my most favorite foods. Along with tacos, I could eat pizza everyday and never get tired of it. That said, as I have become more conscientious about maintaining a healthy diet, pizza has become more of an occasional treat for me.
There are so many styles of pizza and I love them all! Today though, we are doing a skillet, or pan pizza. It’s similar to a Chicago style pizza: a puffy thick crust topped with cheese, then sauce.
This recipe is a two-day process because the dough needs to sit in the fridge overnight. Here’s how you do it, step by step:
Day 1: Dough

Step 1: In a large bowl, add your 2 cups (240 grams) all purpose flour. To this mound add ¾ teaspoon of fine sea salt to one side of the flour. Then add ½ teaspoon active dry or instant yeast to the side opposite the salt. Pour ¾ cup (170 grams) lukewarm water into the center of the flour. To this, add 1 tablespoon olive oil.
Step 2: Using a wooden spoon or silicone spatula, mix ingredients together to form a sticky shaggy dough. This will take about 1 minute by hand. Scrape down the sides of the bowl and form a rough ball. Cover with a towel and let sit for 5 minutes.

Wooden Spatula/Spoon Set | Serving Bowl with Lid | 8 oz Measuring Glass | OXO ¼ Cup
Step 3: After 5 minutes, uncover and grab the side of the dough furthest from you and fold it over the center of the ball towards you. Turn the bowl 90 degrees and do the same. You will do this a total of four times. Four 90 degree turns, Four folds. Then cover and let sit for 5 minutes.
We will repeat Step 3 three more times.

Step 4: After the fourth and last folding, cover the bowl and let sit at room temperature for 40 minutes.
Step 5: Refrigerate, covered for at least 12 hours, but it can sit for up to 72 hours.

Cambro 6 qt Container | Cambro 2 qt Container
*Pro tip: I prefer to transfer my dough to a fresh bowl or container (Cambro is my favorite) for the overnight rise. If you have another large bowl, coat it with a little olive oil and place your dough ball in, turn it once to coat in olive oil and leave it to rise, seam side down. Sweet dreams, dough ball.
Day 2: Toppings and Pizza Assembly
Step 1: About 3 hours before you want to serve the pizza, take it out of the fridge. The dough ball should be roughly double in size.

Cast Iron Skillet | Cambro 6 qt Container | Dish Towel | Oil Bottle
Step 2: Prepare your pan: your pan can be a 9 to 11 inch cast iron skillet (this is the best option for a crispy crust). I am using an 11 inch cast iron that my mom handed down to me, but you can use any oven-safe, heavy bottom skillet, or a 9 to11 inch round cake pan. Use about 1 tablespoon olive oil to grease your pan, be sure to grease the sides as well as the bottom.

Step 3: Place your dough ball in the pan and turn once to coat both sides. Press the dough out from the center to reach the sides of the pan. As you’re pressing out the dough, use your fingertips to dimple the dough. If your dough wants to shrink back, cover it and let it sit for 15 minutes. Then it should be more pliable and reach the sides, but if not, cover it and let it sit for another 15 minutes and try again. By now, your dough should reach the sides and you can push it up the sides a little to create the outer crust, like a pie.

Step 4: Cover and let dough sit at room temperature for about 2 hours
While the dough is having its second rise, let’s prep our toppings. Because the sauce goes on top of the cheese, I am making a chunky, meaty sauce to account for the toppings I would normally add to a thinner crust pizza.
*Why does the cheese go under the sauce? We don’t want to hinder the dough rise with liquid, nor do we want a soggy bottom. So the low-moisture mozz works as a barrier to keep the dough from getting too wet with sauce.

For my sauce, I am browning one pound ground Italian sausage (you can use links, just squeeze the sausage out of their casings). Once cooked through with crispy brown edges, I am adding 6 to 8 very roughly chopped crimini mushrooms. Add a generous pinch of kosher salt. Once the mushrooms are cooked through, reduce heat to low and wait about 3 minutes while the pan cools down slightly, this will hopefully keep the tomato sauce from splattering when it hits the pan. Pour in one jar of your favorite store-bought sauce, add another generous pinch of salt. Let this simmer, stirring occasionally until your dough is done proofing.
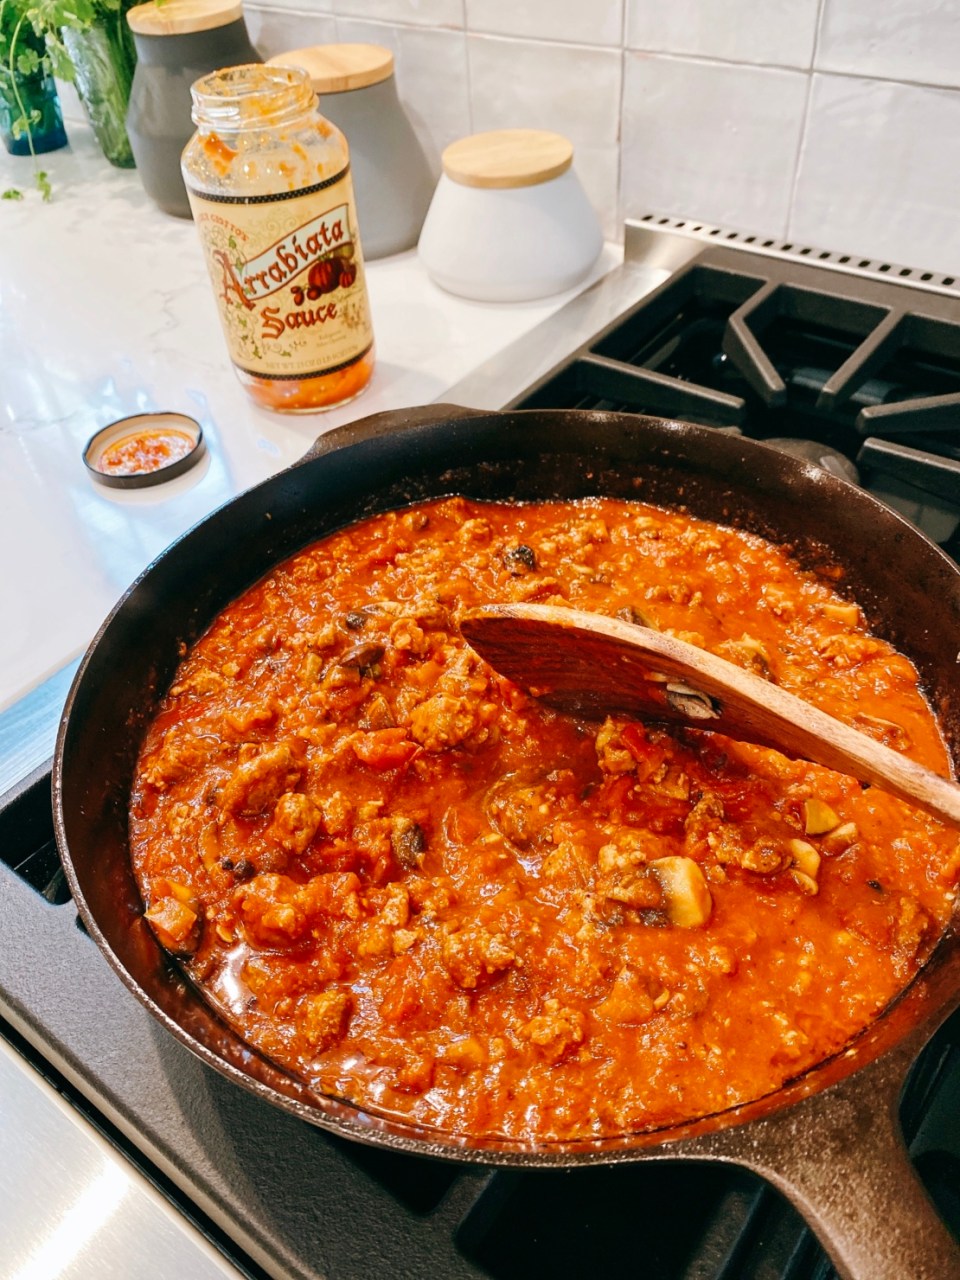
*Optional: about 5 minutes before the sauce comes off the heat, I like to add a generous sprinkling of thyme, fresh garlic, fresh cracked black pepper and crushed red pepper.
About 40 minutes before your dough is ready, arrange your oven racks so that you have one on the bottom for the pizza, and one about 5 inches from the top. Preheat your oven to 450 degrees.
At the two hour proofing mark, check your dough. You will know your dough is ready when it’s a little more puffy and/or when you poke it with your finger it springs back very slowly and leaves an indentation.
Pizza Assembly

Evenly sprinkle your shredded low-moisture mozzarella on the dough. I used about a cup of cheese, add as much as you like. I put cheese all the way to the edge because I like the crispy cheese bits, but you can leave some naked crust if you like.

We like pepperoni, so it’s at this point (after the cheese, but before the sauce) when I add the pepperoni.

Evenly dollop your sauce on top of the cheese (and pepperoni). You don’t want to heavily spread the sauce because you want to keep your cheese layer evenly distributed under the sauce.


Bake on the bottom rack for 18-20 minutes. When the cheese is bubbly and the crust is browning, use a spatula to check the bottom of the pizza.

Fish Spatula | Cast Iron Skillet | 2 Handle Cast Iron Skillet
If the bottom is golden to your liking and the top is also looking good to you, you’re all set and you can place the pan on the stove top to cool slightly. If the bottom is golden but the top could use a little more time, you can place the pan on the upper rack for a few minutes. All ovens cook a little differently, so just go with what looks good to you.

After your pizza has cooled for about 3-5 minutes, use your spatula to ease the pie out of the skillet or pan and place on a wire rack or cutting board for a few more minutes before cutting.
Top with grated cheese, crushed red pepper, fresh basil… whatever you like!

Thank you for checking in this week. I really enjoyed sharing how to make a skillet pizza. What are some of your favorite comfort foods? Let me know in the comments and be sure to let me know if there is anything in particular you’d like to see in this column. You can also find me on facebook and instagram. Thanks so much – I look forward to seeing you again next week! xo Kelly
*Editor’s note: As much as I love to make breads, pizzas, biscuits, etc., I am not super great at getting dough to come out right. I struggle with over-proofing, under-proofing, working my dough too much…you name it. But, here’s the thing: I don’t let it discourage me from trying again. So while this particular dough worked out the first try, I worried it wouldn’t the whole time! But if it hadn’t worked out, I would have tried it again, and again, until it did. It’s all an adventure!

Hello and happy Saturday! Welcome back to Kelly’s Kitchen, I’m so happy you’re here. Yesterday on Fridays with Oscar, Beth shared a great baked eggs recipe for an Easter Sunday brunch. Today I want to share with you a brunch side: how to make perfect herby popovers.

How to make perfect herby popovers
Popovers are similar to Yorkshire pudding; they are eggy, airy and light. A wonderful accompaniment to any meal, they are especially delicious for breakfast and brunch. They can go sweet or savory. Popovers can even be a main dish because you can fill them. Think: meat with gravy, or vegetables with a cream sauce; maybe for dessert with fruit and sweetened ricotta and a drizzle of honey. sky’s the limit!
To add a light flavor and scent to my brunch popovers, I am using Herbes de Provence which I pulverized a little further with a mortar and pestle. My particular Herbes mixture contains fennel, lavender, sage and tarragon. I think this mix is beautifully floral and savory, and goes well with a variety of jams, preserves and savory toppings.
While a basket of fresh warm popovers will be an impressive part of your brunch table, they are pretty simple to make. The trick to getting perfect popovers is all about the steam and the temperature of your ingredients. Popovers need steam to puff up and “popover”. If your batter is too cold they won’t build steam quickly enough to popover, if the batter is too warm it’ll cook the eggs and they won’t rise. There are important steps for getting the maximum amount of steam to give your popovers the loftiness they’re known for. We will cover those steps in today’s recipe.

Popover Tin | Muffin Tin | Sheet Tray
Let’s get started
You don’t need a special popover tin to make these. I happen to have a muffin tin and a popover tin, so I will show you how they come out in both. Popovers turn out somewhat amorphous regardless, so I don’t really have a preference for the tin.
*Pro-tip: put your tin on a sheet tray for a few reasons: a) to catch the drips, b) it’s easier to handle the tins and, c) the sheet tray will conduct heat more evenly.
Step 1: You will bake the popovers on a lower rack in your oven, so rearrange your oven racks as needed. Preheat your oven to 450 degrees, this will likely take about 30 minutes. Once you’re at temperature, put your tins in the oven to preheat for about 10 minutes while you mix the batter.
This is the first trick to getting the batter to steam – hot tins.

Mortar and Pestle | Pyrex 8 Cup | Dish Towel | Measuring Spoons
Step 2: Let your ingredients come to room temperature. You can either let the eggs and milk sit on the counter for an hour, or you can warm the eggs in hot water for 10 minutes and microwave the milk until it is lukewarm (about 1 minute).
Step 3: Mix your 3 eggs and 1 cup milk until frothy, you want a little air in there. The bubbles will help make the popovers light and airy.

Step 4: Add 1 cup of all purpose flour and ½ teaspoon coarse salt. Add the herbs (if using). I am adding about 1 teaspoon of my Herbes blend.
Mix thoroughly, but don’t over mix your batter or your popovers will be tough. It’s ok if there are a few small lumps in it. The batter should be pretty thin, like a thin pancake batter.

Step 5: I like to use butter to grease my tins instead of using cooking spray. What I like to do is drop a ½ inch-sized cube of butter into each well just before I pour in the batter. If you do it this way, cut your butter cubes before you mix your batter so they’re ready to go and aren’t too cold.

*Use caution when pulling tins from the oven, they’re hot and you will want to work quickly to get your butter in the tins and pour the batter before the tins cool too much.
Step 6: Pour the batter to fill each well about ½ full. Bake at 450 degrees for 20 minutes. Then reduce temperature to 350 and bake for 6-10 minutes more. Popovers should be golden brown and popping over, out of their wells.


Popover Tin | Muffin Tin | Sheet Tray
Step 7: Remove from the oven and transfer popovers to a wire cooling rack.

Step 8: Serve while still warm from the oven.

Top the pop
Popovers are extra special when you serve them with a variety of toppings. Because I made herbed popovers, I am serving them with homemade lemon curd, Georgia peach jam, creme fraiche and of course, salted butter. Cultured butter would be another delicious way to top your popovers.

Similar Orla Kiely Cheese Board | Mercer Dishware | Furoshiki Cloth
For a savory option, consider adding smoked salmon and creme fraiche to your array of accoutrements. My husband especially likes them this way. You can mix some lemon and chives or dill in your creme fraiche for more flavor!
Herby Popovers
- 1 cup Whole Milk
- 3 Eggs
- 1 cup All Purpose Flour
- 1/2 tsp Coarse Salt
- 1 tsp Dried Herbs (optional)
- Butter (for greasing tins)
-
Preheat oven to 450 degrees, preheat tins in oven
-
Mix room temperature eggs and milk until frothy
-
Add flour, salt, herbs and mix thoroughly
-
Remove tins from oven and drop in 1/2 inch butter cubes
-
Pour batter to fill wells 1/3 to halfway
-
Bake at 450 for 20 minutes, then reduce temperature to 350 and bake for 6-10 minutes more until popovers are golden brown and popping over
-
Transfer to cooling racks and serve warm

And that’s how to make perfect herby popovers. I hope you give them a try, they are deceptively simple and really add some specialness to your meal. Thank you for tuning in and be sure to let me know in the comments if there is anything in particular you’d like to see in this column. You can also find me on facebook and instagram. Thanks so much – I look forward to seeing you again next week! xo Kelly
hey gang! it’s beth. for a long time now, i have wanted to open up the blog for a guest column. and with the new “normal”, now is the perfect time. saturday is our down day over here on the blog—so why not open it up for some new content?
over the past few years, many of you have reached out asking for more recipes and cooking-related content. turns out that that’s right up my daughter-in-law kelly’s alley. many of you know her: she’s been working here at style at a certain age behind the scenes for a long time now. but did you know that she’s also worked in and around the kitchen—personally and professionally—her entire life? a few months ago, kelly pitched the idea of a weekly cooking column. finally, i am excited today to introduce you to kelly’s kitchen—-her new weekly Saturday column.
Hello and welcome to Kelly’s Kitchen!
Hi! my name is Kelly. You may remember me from a few appearances on the blog over the last year. Since moving to Athens, Georgia last year with my husband, I have been working with Beth on the blog design and content.

My passion is for cooking. I did not go to cooking school, but prior to becoming a designer, I worked as a cook in a variety of restaurants, so I have picked up some tips along the way. But mostly, I cook by instinct. I rarely follow recipes to the letter, typically I will read a recipe as a guideline and alter it based on what I have on hand, or what I feel like doing.
How to make a French omelette
For this inaugural column, I want to start with the basics – eggs. Specifically, an omelette. It’s likely most of us have had an omelette of one flavor or another. But have you ever had a French omelette? A French omelette is just eggs and butter, a little white pepper, coarse sea salt and finely chopped chives. No filling. It’s cooked on low heat and rolled just before the eggs are completely set to create a creamy, slightly wet texture inside. So, here we go: how to make a French omelette.
A traditional French omelette is rich and satisfying all on its own, but what if you wanted to take it one step further? I got the idea to add Boursin to my French omelette from Chef Ludo Lefebvre when he made one on the PBS show, The Mind of a Chef. The addition of Boursin, he described, was the French version of adding American cheese to your omelette. Haha! Well, needless to say I had to try one!
After several messy attempts over as many Sundays, I finally got the hang of getting the eggs to roll up nicely and without any browning. Fortunately, the messy ones were just as delicious, so no one was disappointed. I am still not a pro, but it’s so rewarding when I get it right!

nonstick pan | silicone spatula | 4 cup measuring cup
It’s important to have the right tools. a nonstick pan and a silicone spatula make this recipe so much easier!

What is Boursin? Boursin is an herbed goat cheese spread. It’s widely available at the grocery store, but if you can’t find it, use plain goat cheese.

Be sure to mix your eggs very thoroughly to emulsify the whites completely. Try not to whip in too much air. Use a fork instead of a whisk.

Turn your burner to medium low. Add the butter to your nonstick pan.
Let the butter melt and foam a little, but don’t let it sizzle.
Add your eggs and sprinkle with a pinch of white pepper and flaky sea salt. Begin to stir vigorously with a silicone spatula while moving the pan in a circular motion. Scrape the sides so no crusty bits form around the edge of your eggs.

Pro tip: the trick with this technique, I learned, is to keep the flame low so the eggs don’t get ahead of you. It may seem like it’s taking forever, but trust me, in what seems like 3 seconds, your omelette can go from perfect to brown and overdone.
As soon as the eggs begin to coagulate, shake the pan to let the uncooked eggs settle. Once the eggs are cooked on the bottom, but still runny on top, lift an edge of the egg to check if it’s holding together in one piece. If it is, remove from heat and let sit for about one minute.

Add dollops of Boursin along the center of the omelette, perpendicular to the handle. then, starting at the edge closest to the handle, using your silicone spatula, lift the edge and begin to roll the omelette onto itself towards the center.

Once you have it this far, add more butter and tilt the pan to allow the butter to melt toward the omelette. This will help rolling it the rest of the way.

Continue rolling and then turn the omelette out onto a plate. If the dismount was messy, it’s perfectly ok to use your (clean) hands to reshape.

Smooth a little more butter over the omelette, sprinkle with flaky salt and chives. Et Voilà! You’ve done it! A fancy French omelette!

dinnerware | similar cloth napkin
Serve with a side salad of fresh leafy herbs and butter lettuce.
Side-salad
For the salad (make this before you begin your eggs):
- Tear butter lettuce into large pieces
- Roughly chop herbs such as Italian flat leaf parsley, cilantro and, or basil
- Toss together with a healthy drizzle of olive oil, and about ¼ cup apple cider vinegar
- Just before serving, sprinkle with flaky salt and a few cranks of fresh cracked pepper

Thanks for joining me today for my inaugural column: how to make a French omelette. Thank you, Beth, for this opportunity. You can also find me on facebook and instagram. I hope you all tune in next Saturday to Kelly’s Kitchen.
French Omelette with Boursin
- 2 large eggs
- 2 tbsp unsalted butter, room temperature, divided, plus more for serving (if you can get European-style butter (such as Plugra) great, but if not that's just fine)
- Fleur de sel or other coarse sea salt (pinch, to taste)
- Freshly ground white pepper (pinch, to taste)
- 1 oz Boursin pepper or herbed cheese
- 1 tbsp finely chopped chives
-
mix your eggs very thoroughly to emulsify the whites completely. try not to whip in too much air
-
add your eggs and sprinkle with a pinch of white pepper and flaky sea salt.
-
begin to stir with a silicone spatula while moving the pan in a circular motion. scrape the sides so no crusty bits form around the edge of your eggs.
-
as soon as the eggs begin to coagulate, shake the pan to let the uncooked eggs settle. once the eggs are cooked on the bottom, but still runny on top, remove from heat and let sit for about one minute.
-
add dollops of Boursin along the center of the omelette, perpendicular to the handle. then, starting at the edge closest to the handle, using your silicone spatula, lift the edge and begin to roll the omelette onto itself towards the center.
-
once you have it this far, add more butter and tilt the pan to allow the butter to melt toward the omelette. continue rolling and then turn the omelette out onto a plate.
-
smooth a little more butter over the omelette, sprinkle with flaky salt and chives.


newsletter sign up
get
delivered right
to your inbox!
style